Cake decorations play a vital role in creating visually stunning cakes that are not only delicious but also pleasing to the eye. Among the many techniques and tools available for cake decorating, sugar shapes hold a special place. These versatile and intricately designed sugar creations can transform any ordinary cake into a masterpiece, adding an extra touch of elegance and charm.
Sugar shapes come in various forms and designs, from delicate flowers to whimsical characters and everything in between. They can be used to enhance any theme or occasion, making them an essential element in cake decorating. Whether you’re celebrating a birthday, wedding, or any other special event, incorporating sugar shapes into your cake design will surely leave a lasting impression on your guests.
Creating your own sugar shapes is not as daunting as it may seem. With simple ingredients and tools readily available at home, you can learn how to make homemade sugar decorations that are just as beautiful as store-bought ones. In this article, we will guide you through the step-by-step process of making sugar shapes and provide tips and tricks to ensure perfectly shaped and detailed decorations every time.
So, if you’re ready to take your cake decorating skills to the next level and add a magical touch to your creations, join us as we explore the enchanting world of sugar shapes. Discover different types of sugar shapes, learn how to make them yourself, explore creative ideas for incorporating them into your designs, and gain valuable insights into proper placement and maintenance. Get ready to unleash your creativity with the ultimate game changer in cake decorating – sugar shapes.
Exploring Different Types of Sugar Shapes
Cake decorating is not just about making delicious cakes; it’s also about making them visually appealing. The right cake decorations can elevate a simple cake into a work of art. One popular and versatile option for cake decorations is sugar shapes. These edible creations add charm, personality, and beauty to any cake design.
There is a wide range of sugar shapes available in the market. From delicate flowers to intricate hearts, letters, numbers, and more, these shapes offer endless possibilities for enhancing any cake theme or occasion. Whether you’re celebrating a birthday, wedding, anniversary, or any other special event, there’s a sugar shape that will perfectly complement your cake design.
To take your cake decorating skills to the next level and add a personal touch to your creations, you can also make your own sugar shapes at home. With just a few simple ingredients and tools like molds or cutters, you can create beautifully shaped and detailed sugar decorations. Not only does this give you complete control over the design and color of the shapes, but it also allows you to customize them according to your specific needs.
| Type | Description |
|---|---|
| Flowers | Delicate and vibrant sugar flowers in various sizes and colors. |
| Hearts | Sugar hearts perfect for romantic occasions such as weddings or anniversaries. |
| Letters | Alphabet-shaped sugar decorations for spelling out names or messages on cakes. |
| Numbers | Sugar numbers for celebrating birthdays or anniversaries. |
With the different types of sugar shapes available, you can easily find the perfect ones to suit your cake design and theme. Whether you choose ready-made sugar shapes or decide to create your own, they will surely be a game-changer in your cake decorating journey. These delightful decorations will add that final touch of magic, making your cakes truly memorable and eye-catching.
How to Make Your Own Sugar Shapes
Making your own sugar shapes is a fun and creative way to add a personal touch to your cake decorations. Not only can you save money by making them yourself, but you also have complete control over the design, color, and texture of the sugar shapes. In this section, we will provide you with a step-by-step guide on how to make your own sugar shapes using simple ingredients and tools.
To begin, you will need the following ingredients:
- Granulated sugar.
- Water.
- Gel food coloring or dusting powders for coloring (optional).
You will also need some basic tools such as:
- Silicone molds in various shapes (flowers, letters, numbers, etc).
- Rolling pin.
- Cornstarch or powdered sugar for dusting.
Here is a step-by-step guide on how to make homemade sugar shapes:
- Start by mixing granulated sugar and water in a bowl until it forms a thick paste-like consistency. Make sure there are no lumps in the mixture.
- If desired, add gel food coloring or dusting powders to achieve the desired color for your sugar shapes. Mix well until the color is evenly distributed.
- Dust your work surface with cornstarch or powdered sugar to prevent sticking.
- Roll out the sugar paste using a rolling pin until it reaches approximately 1/8 inch thickness.
- Press the silicone mold into the rolled-out sugar paste firmly and evenly.
- Carefully remove the excess paste around the edges of the mold using a knife or spatula.
- Gently release the molded shape from the mold by flexing it slightly or tapping it on a flat surface.
- Place the shaped sugar onto parchment paper or a silicone mat to dry completely. This process may take anywhere from 24 hours to several days depending on humidity levels.
Tips and tricks for achieving beautifully shaped and detailed sugar decorations:
- To add texture to your sugar shapes, you can use embossers or stencils before pressing them into the molds.
- For more intricate designs, consider using a fondant smoother or a small brush to ensure that the sugar paste fills in all the details of the mold.
- If you find that your sugar shapes are too delicate or prone to breaking, you can add a small amount of tylose powder to the mixture. This will help strengthen the shape and make it more sturdy.
Making your own sugar shapes allows for endless creativity and customization in your cake decorating endeavors. Experiment with different colors, shapes, and textures to create unique and visually stunning designs that will impress your friends and family.
Popular Techniques for Using Sugar Shapes in Cake Decorating
When it comes to cake decorating, the use of sugar shapes can take your creations to a whole new level. They offer endless possibilities for adding texture, dimension, and personalization to your cakes. In this section, we will explore some popular techniques for using sugar shapes that will inspire your creativity.
One technique that is commonly used is the embedded design. This involves embedding the sugar shapes directly into the icing or fondant of the cake. For example, you could create a stunning floral arrangement by placing sugar flowers directly onto the surface of the cake. This technique creates a seamless look and gives the illusion that the decorations are part of the cake itself.
Another technique is cascading patterns. This involves arranging sugar shapes in a cascading or flowing pattern on the sides of the cake. For instance, you could use heart-shaped sugar decorations to create a waterfall effect or arrange sugar letters to spell out a message that flows down the side of the cake. This technique adds movement and visual interest to your designs.
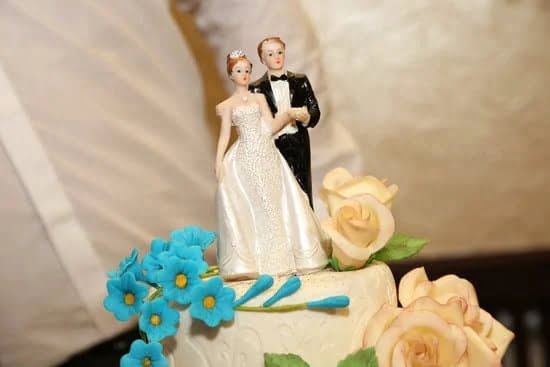
Additionally, centerpiece accents are another popular technique for using sugar shapes in cake decorating. These accents serve as focal points and can be placed on top of the cake or as standalone decorations on smaller cakes or cupcakes. Examples include a sugar crown for a princess-themed cake or a baby’s first birthday number made entirely out of sugar.
By experimenting with these techniques or creating your own unique methods, you can create unforgettable cakes that truly wow your guests. The key is to let your imagination run wild and have fun with it.
Exploring Different Color and Texture Options for Sugar Shapes
In addition to their versatility in shape and design, sugar shapes also offer a wide range of color and texture options that can elevate cake decorating to the next level. By incorporating various coloring methods and exploring different techniques for creating texture, decorators can truly customize their sugar shapes to complement any cake theme or occasion.
One popular way to add color to sugar shapes is by using gel colors. These highly concentrated food coloring gels are ideal for achieving vibrant and intense hues on your decorations.
Simply add a small amount of the gel color to your sugar paste or fondant, knead it until the color is evenly distributed, and then shape it into your desired shape. The gel colors are available in a vast array of shades, making it possible to match any color scheme.
Another option for coloring sugar shapes is by using dusting powders. These edible powders come in a range of shades and can be used to create subtle or bold effects on your decorations. To apply dusting powder, use a soft brush to gently dust the dry powder onto the surface of your sugar shape until you achieve the desired effect.
For decorators looking for more intricate designs or patterns on their sugar shapes, edible paints are an excellent choice. Edible paints allow for precise detailing and can be applied with paintbrushes or even airbrush systems. These paints usually come in liquid form and dry quickly on the surface of the decoration.
Alongside color options, decorators can also experiment with different techniques for creating texture on their sugar shapes. One method is by using molds, which can add depth and dimensionality to your decorations. There are countless molds available in various designs – from lace patterns to intricate floral motifs – allowing you to create beautifully textured sugar shapes effortlessly.
Embossers are another great tool for adding texture. These tools have detailed patterns engraved on them that transfer onto the surface when pressed onto rolled-out fondant or sugar paste. By using embossers, decorators can achieve raised and textured designs on their sugar shapes efficiently.
Lastly, stencils are a versatile option for adding texture to sugar shapes. Stencils are placed over the rolled-out fondant or sugar paste, and then a thin layer of royal icing or edible paint is spread over the stencil to create the desired design. Once the stencil is carefully lifted, an intricate pattern is revealed on the sugar shape.
By exploring different color and texture options for sugar shapes, cake decorators can unleash their creativity and transform their cakes into works of art. Whether it’s achieving vibrant colors with gel colors, adding subtle details with dusting powders, or creating intricate patterns with molds, embossers, or stencils, the possibilities are endless when it comes to customizing these eye-catching decorations.
Unique Ideas for Incorporating Sugar Shapes in Cake Designs
Personalized Monograms
One unique idea for incorporating sugar shapes in cake designs is by using personalized monograms. Monogram cake toppers can add a touch of sophistication and elegance to any cake.
They can be made by molding sugar paste into the shape of initials or names and then using edible paints or dusting powders to add color and detail. These monograms can be placed on top of the cake as a centerpiece or positioned strategically on the sides for a more subtle effect.
3D Animal Figures
Another fun idea for using sugar shapes in cake designs is by creating 3D animal figures. Sugar paste can be shaped and sculpted into various animal shapes, such as elephants, giraffes, lions, or birds. The figures can be painted with edible colors to bring them to life and enhance their appearance. These 3D animal figures can then be placed on top of the cake as playful accents or used to create whimsical scenes on the sides of the cake.
Whimsical Characters
For those looking for a touch of whimsy and creativity in their cake designs, incorporating sugar shapes of whimsical characters is a fantastic idea. Whether it’s fairy-tale characters like unicorns, mermaids, or princesses, or adorable creatures like teddy bears or robots, these sugar shapes can instantly transform a plain cake into a magical masterpiece.
By using molds and embossers, intricate details can be added to these characters, and they can be painted with vibrant colors to make them eye-catching.
These unique ideas for incorporating sugar shapes in cake designs demonstrate the endless possibilities that exist when it comes to decorating cakes. From elegant monograms to playful animal figures and whimsical characters, sugar shapes offer decorators the opportunity to let their creativity run wild and create truly memorable cakes that will impress guests at any occasion.
Tips for Proper Placement and Application of Sugar Shapes
Achieving Balanced Proportions
When it comes to placing sugar shapes on a cake, achieving balanced proportions is crucial for creating an aesthetically pleasing design. You want your decorations to enhance the overall appearance of the cake without overwhelming it. One tip is to consider the size of the cake and choose sugar shapes that are proportionate to its dimensions.
For example, if you’re decorating a small round cake, opting for smaller sugar shapes like flowers or hearts would be more appropriate. On larger cakes, you can go for bigger and more intricate designs.
Creating Symmetry
Symmetry plays a key role in making sure your sugar shapes are well-placed and visually appealing. One approach is to create symmetry by placing identical sugar shapes equidistant from each other, forming patterns or borders around the cake. For example, if you’re using heart-shaped sugar shapes, you can place them in pairs around the perimeter of the cake or in a symmetrical pattern on top.
Another technique is to use asymmetrical placement strategically for a more organic and artistic look. Consider clustering smaller sugar shapes together on one side of the cake or scattering them randomly for a whimsical effect.
Secure Attachment
To ensure that your sugar shapes stay securely in place on your cake, it’s important to use proper techniques for attachment. Depending on the design and size of your decoration, you may need different methods. For smaller and lighter sugar shapes like flowers or letters, edible adhesives such as royal icing or fondant glue are often sufficient.
Apply a small amount of adhesive to the back of the shape and gently press it onto the desired location on the cake. For larger or heavier sugar shapes like 3D animal figures or centerpiece accents, consider using support structures such as dowels or toothpicks inserted into the cake before attaching them.
By following these tips for proper placement and application of sugar shapes, you can create stunning cake designs that are visually harmonious. Experiment with different arrangements and techniques to find the perfect balance and symmetry for your unique cake decorating vision.
Remember to step back and evaluate the overall look of the cake as you go along, making any necessary adjustments to achieve the desired effect. With careful planning and attention to detail, your sugar shapes will become integral elements that elevate your cakes to a new level of artistry and beauty.
Maintenance and Storage of Sugar Shapes
Maintaining and properly storing sugar shapes is essential to ensure their longevity and preserve their delicate texture. Sugar shapes can be quite fragile, so it is important to handle them with care and take the necessary steps to protect them from damage. Here are some guidelines for maintaining and storing your sugar shapes.
Firstly, it is crucial to store sugar shapes in a cool and dry environment. Excess moisture can cause the shapes to become sticky or even dissolve. Therefore, it is best to keep them away from humid areas in the kitchen or places where they may come into contact with water. Additionally, direct sunlight should be avoided as it can cause fading of the colors used to decorate the shapes.
One effective method for storing sugar shapes is by placing them in an airtight container. This helps prevent exposure to air, which can lead to the absorption of moisture and loss of shape. When selecting a container, consider one that allows for enough space around each shape so that they do not touch or overlap.
Furthermore, if you plan on transporting your cake with the sugar shapes, it is important to take extra precautions to avoid breakage. One practical tip is lining the bottom of the container or box with a soft cushioning material like tissue paper or bubble wrap. This will provide an added layer of protection against any potential impact during transportation.
Lastly, depending on the intricacy of your sugar shapes, you may need a special storage solution such as individual compartments within a storage container or small boxes specifically designed for cake decorations. These options help prevent any accidental damage that could occur when shifting or moving other items stored together with the sugar shapes.
By following these storage guidelines and handling your sugar shapes with care, you can ensure they retain their shape and texture until you are ready to use them for your next cake decorating project. Proper maintenance and storage of these delicate decorations are key in preserving their beauty and making sure they stay intact until they are put onto the cake.
Conclusion
In conclusion, sugar shapes are truly the ultimate game changer in cake decorating. Their importance cannot be overstated when it comes to making cakes visually appealing and memorable. Whether you are a professional cake decorator or a novice baker, incorporating sugar shapes into your creations can elevate the overall design and theme of any cake.
Throughout this article, we have explored different types of sugar shapes, from delicate flowers to elegant letters and numbers. The versatility of sugar shapes allows for endless possibilities in enhancing any cake theme or occasion. By creating your own sugar shapes using simple ingredients and tools, you can personalize your cakes even further and add your own unique touch.
We have also discussed various techniques for using sugar shapes in cake decorating, such as embedded designs, cascading patterns, and centerpiece accents. These techniques not only showcase the beauty of sugar shapes but also provide inspiration for creativity. Additionally, we have explored different color and texture options for sugar shapes, allowing you to customize them to perfectly match your cake design.
When it comes to incorporating sugar shapes into cake designs, the possibilities are truly limitless. From personalized monograms to whimsical characters or 3D animal figures, there is no end to the creative ideas that can bring your cakes to life. And with proper placement and application techniques, along with the use of edible adhesive or frosting techniques, you can ensure that your sugar shapes stay securely attached to your cakes.
Frequently Asked Questions
How to make sugar designs for cakes?
Making sugar designs for cakes can be a fun and creative way to add a personal touch to your baked goods. One popular method is using royal icing, which is made from egg whites and powdered sugar. Start by outlining the design on parchment paper or a silicone mat using a piping bag with a small round tip. Then, fill in the design with the desired colors of royal icing.
Allow the icing to dry completely before carefully peeling it off and gently pressing it onto the cake. Another technique involves melting colored sugar in molds specifically designed for creating edible decorations. Simply melt the sugar, pour it into the molds, and let it cool until hardened. Once ready, these sugar designs can be placed directly onto cakes or attached using edible glue or frosting.
How to make molded sugar decorations?
Molded sugar decorations can add an elegant touch to any cake or dessert presentation. To make molded sugar decorations, you will need isomalt or granulated sugar as your main ingredient. In a heat-resistant container, heat the isomalt or sugar until it melts and turns into a clear liquid.
Carefully pour this liquid into silicone molds that are specifically designed for creating intricate shapes and designs out of sugar. Allow the melted sugar to cool and harden completely before gently removing them from the molds. These molded sugar decorations can then be placed on top of cakes, cupcakes, or other sweet treats.
How to make candy decorations for cakes?
Creating candy decorations for cakes is another fantastic way to add color and excitement to your desserts. The possibilities are endless when it comes to making candy decorations! One popular technique involves melting colorful candy melts in various shades and pouring them into different shaped silicone molds such as flowers, stars, hearts, etc., once hardened they can be easily removed from the mold for placement atop cake surfaces .
Alternatively, you can use lollipop sticks or toothpicks to create lollipops by dipping them into melted candy melts and allowing them to harden on parchment paper. These candy decorations can be placed directly onto cakes or attached using edible glue or frosting. Additionally, you can explore techniques like making spun sugar by melting sugar and carefully spinning it around a fork or whisk until threads form, which can then be draped over the cake for a delicate and elegant effect.

Welcome to our cake decorating blog! My name is Destiny Flores, and I am the proud owner of a cake decorating business named Cake Karma. Our mission is to provide delicious, beautiful cakes for all occasions. We specialize in creating custom cakes that are tailored specifically to each customer’s individual needs and tastes.


