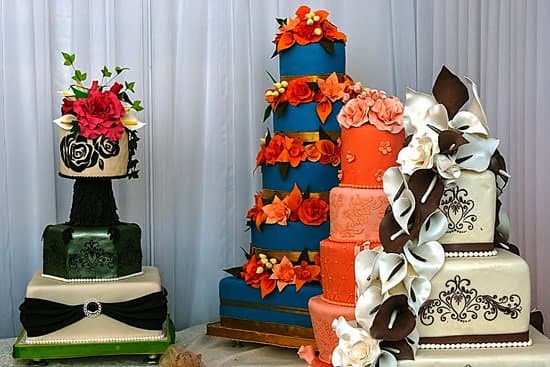
Are you looking to add a touch of elegance and artistry to your homemade cakes? Learn how to make fondant cake decorations and elevate your baking game to the next level. Fondant is a versatile, pliable icing that allows you to create intricate and stunning designs to adorn your cakes. From simple shapes to elaborate sculptures, the possibilities with fondant are endless.
Fondant cake decorations have become increasingly popular due to their smooth, professional-looking finish and ability to be molded into any shape or design. Whether you’re a beginner or an experienced baker, mastering the art of fondant decoration can take your cakes from ordinary to extraordinary. In this article, we will guide you through the process of creating beautiful fondant cake decorations that will leave a lasting impression on any occasion.
In the following sections, we will provide you with all the necessary information and tips you need to get started on your fondant cake decorating journey. From essential tools and materials needed to expert techniques for shaping, molding, coloring, and assembling your decorations, you’ll learn everything you need to know to create show-stopping cake designs. Let’s dive into the world of fondant cake decorations and unleash your creativity.
Getting Started
In addition to the fondant, you will need some basic tools such as a rolling pin, cornstarch or powdered sugar for dusting, and a sharp knife or pizza cutter for cutting the fondant into different shapes. It’s also helpful to have a variety of shaping tools like cookie cutters, silicone molds, and sculpting tools for creating intricate designs.
When it comes to coloring your fondant, gel food coloring is recommended as it provides vibrant colors without altering the consistency of the fondant. And finally, having a clean work surface and non-stick mat will make the process of rolling out and shaping the fondant much easier.
Once you have gathered all of these essential tools and materials, you are ready to begin creating beautiful fondant cake decorations. In the following sections, we will discuss how to prepare the fondant, techniques for shaping and molding it, adding vibrant colors, assembling different elements together, adding finishing touches, and expert tips and tricks for perfecting your edible masterpieces.
Preparation
Before you start creating fondant cake decorations, it’s important to prepare the fondant properly in order to ensure the best results. One of the first things to consider is the type of fondant you’ll be using. There are two main types of fondant – rolled fondant and poured fondant. Rolled fondant is more commonly used for cake decorations, and it’s what we’ll be focusing on here.
To prepare your rolled fondant for decorating, start by kneading it until it becomes soft and pliable. This will make it easier to work with and mold into different shapes and designs. Additionally, make sure to have a clean, smooth work surface dusted with powdered sugar or cornstarch to prevent sticking.
Another important tip for preparing rolled fondant is to keep it covered at all times when not in use. Fondant can dry out quickly when exposed to air, so be sure to keep any unused portions tightly wrapped in plastic wrap or a resealable bag. This will help keep the fondant soft and ready for shaping when needed.
Finally, if you’re planning to color your fondant decorations, consider adding gel food coloring a little at a time until you achieve the desired shade. Remember that a little goes a long way with gel food coloring, so start with small amounts and gradually add more as needed.
| Type of Fondant | Rolled Fondant |
|---|---|
| Tips for Softening | Knead until soft and pliable |
| Tips for Storing | Keep covered at all times when not in use |
| Tips for Coloring | Add gel food coloring gradually until desired shade is achieved |
Shaping and Molding
Creating fondant cake decorations allows for endless creativity and the ability to bring any design to life. From flowers and figures to intricate shapes and patterns, mastering the techniques for shaping and molding fondant is essential for creating stunning cake decorations. Below are some expert tips on how to make fondant cake decorations using various shaping and molding techniques:
- Rolling: Before starting to shape fondant, it’s important to roll it out to the desired thickness using a rolling pin. This will make it easier to work with and mold into different shapes.
- Embossing: Use embossing tools or textured mats to add beautiful designs and patterns to your fondant. Simply press the tool onto the rolled-out fondant to create intricate details.
- Cutting: Use various cutting tools such as cookie cutters, knives, or fondant cutters to create precise shapes and designs. This is perfect for creating flowers, leaves, or any other specific shapes for your cake decorations.
Once you have mastered these basic shaping and molding techniques, you can move on to more advanced methods such as sculpting figures or creating three-dimensional objects with fondant. These skills will elevate your cake decorating game and allow you to bring even more complex designs to life.
Adding depth and dimension to your fondant creations can be achieved by layering pieces of fondant or using molds and formers that help give your decorations a lifelike appearance. Experiment with different techniques to find what works best for your specific design ideas, and don’t be afraid to let your creativity run wild when shaping and molding fondant for your cake decorations.
Coloring
For those interested in learning how to make fondant cake decorations, adding vibrant colors to your fondant creations is an essential step in creating visually stunning and eye-catching designs. Here, we’ll explore some techniques for coloring your fondant to achieve the desired shades and hues for your cake decorations.
One of the most common methods for coloring fondant is to use gel or paste food coloring. These types of colorants are highly concentrated and come in a wide range of vibrant colors, allowing you to achieve intense and bold shades.
To start, simply knead a small amount of the gel or paste color into your fondant until the color is evenly distributed. Remember to start with a small amount as it’s easier to add more color than to try and lighten an overly dark shade.
Another technique for coloring fondant is by using powdered food coloring. This type of colorant is great for achieving softer, pastel shades and can also be used to dust onto finished decorations for a subtle hint of color. Simply mix the powdered coloring with a small amount of clear alcohol (such as vodka) to create a paint-like consistency that can be brushed or painted onto your fondant decorations.
In addition to traditional food coloring, you can also use edible dusts and airbrush colors to add depth and dimension to your fondant decorations. Edible dusts can be brushed onto finished decorations to add shimmer or subtle highlights, while airbrush colors allow for more intricate and detailed designs on larger cake decorations.
With these various coloring techniques at your disposal, you’ll be able to create beautifully colored fondant cake decorations that are sure to impress at any celebration or event.
Assembling
Putting together different elements to create a stunning cake topper or decoration requires careful planning and attention to detail. Whether you are creating a simple fondant flower or a more intricate figurine, the process of assembling fondant decorations can be both rewarding and enjoyable.
Design Planning
Before you start assembling your fondant decorations, it’s important to have a clear plan in mind. Consider the overall design of the cake and how your decorations will fit into it. If you are creating multiple elements, such as flowers, leaves, and other shapes, visualize how they will come together to form a cohesive and visually appealing composition.
Layering and Positioning
When it comes to assembling fondant decorations, layering and positioning play a crucial role in creating depth and dimension. Start by determining the base layer or foundation of your decoration, whether it’s a flat surface for arranging flowers or a standing position for figurines. Then carefully stack and arrange additional elements on top, taking care to create balance and symmetry in your design.
Adhering Elements
One challenge when assembling fondant decorations is ensuring that the different elements stick together securely. Use edible glue or water sparingly to adhere pieces together, taking care not to add too much moisture that could cause the fondant to become sticky or misshapen. For larger or heavier decorations, consider using toothpicks or floral wire as structural support.
By following these tips for assembling fondant cake decorations, you can bring your vision to life with precision and creativity. Whether you are crafting a simple design or an elaborate masterpiece, the process of putting together different elements will ultimately result in a stunning cake decoration that is sure to impress.
Finishing Touches
Adding the finishing touches to your fondant cake decorations can truly elevate the overall look of your creation. Whether you’re making a simple cake topper or intricate fondant flowers, paying attention to detail is key. Here are some tips for adding those final embellishments:
1. Intricate Designs: To add intricate designs to your fondant decorations, consider using small, specialized tools such as embossing sticks, piping tips, or even toothpicks. These tools will allow you to create delicate patterns, textures, and details on your fondant pieces.
2. Edible Pearls and Gems: Consider adding edible pearls and gems to your fondant decorations for a touch of elegance. These tiny embellishments can be easily attached using a small amount of edible glue or clear piping gel.
3. Metallic Finishes: If you want to achieve a metallic finish on your fondant decorations, consider using edible luster dust or metallic food spray. These products come in a variety of colors and can be used to create stunning gold, silver, or bronze accents on your decorations.
Incorporating these finishing touches will undoubtedly enhance the overall look of your fondant cake decorations. By paying attention to detail and adding these final embellishments, you’ll create an eye-catching and professional-looking cake that’s sure to impress.
Expert tip: Allow ample time for these finishing touches so that you can carefully place each element with precision and care. Rushing through this step could compromise the overall appearance of your fondant cake decoration masterpiece.
Tips and Tricks
Work With a Clean Surface
One of the most important tips for perfecting fondant cake decorations is to work on a clean, smooth surface. Dust your work area with powdered sugar or cornstarch to prevent the fondant from sticking. You can also use a non-stick silicone mat to make it easier to roll out and mold the fondant into different shapes.
Use Quality Ingredients
To ensure that your fondant decorations turn out beautifully, it’s crucial to use high-quality ingredients. Opt for premium fondant that is pliable and easy to work with. Investing in gel food colors will also give you vibrant and consistent shades when coloring your fondant.
Storage and Preservation
Properly storing and preserving your fondant decorations is essential for maintaining their shape and color. To keep your decorations from drying out, store them in an airtight container at room temperature away from direct sunlight. If you want to preserve your decorations long-term, consider using edible varnish or clear piping gel to seal in moisture and protect the colors.
By following these expert tips and tricks for making fondant cake decorations, you can elevate the visual appeal of your cakes and create stunning edible works of art that will impress everyone. Whether you’re a beginner or a seasoned baker, mastering the art of working with fondant will open up endless possibilities for decorating cakes for any occasion.
Conclusion
In conclusion, learning how to make fondant cake decorations can truly elevate your baking skills and take your cakes to the next level. By following the essential tools and materials needed, along with tips for preparing the fondant and techniques for shaping and molding, you can create stunning designs that will impress your family, friends, and clients.
Coloring your fondant decorations with vibrant colors and assembling different elements to create a stunning cake topper or decoration will add a personal touch to your baked creations. Adding finishing touches with detail and intricate designs will enhance the overall look of your cakes, making them stand out at any special occasion.
Whether you’re a beginner or an experienced baker, these expert tips and tricks for perfecting fondant cake decorations are sure to help you achieve professional-looking results. With practice and patience, you can celebrate the success of your beautifully decorated fondant cake and take pride in creating edible works of art that are as beautiful as they are delicious. Happy baking.

Welcome to our cake decorating blog! My name is Destiny Flores, and I am the proud owner of a cake decorating business named Cake Karma. Our mission is to provide delicious, beautiful cakes for all occasions. We specialize in creating custom cakes that are tailored specifically to each customer’s individual needs and tastes.


