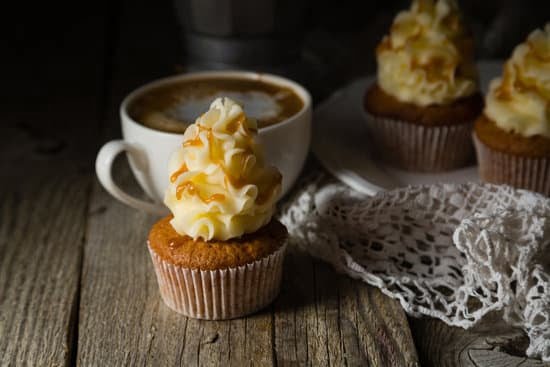
Butter icing is a beloved and versatile option for cake decoration, offering a smooth texture and delicious taste that enhances any dessert. With its popularity spanning across both novice bakers and professional pastry chefs, butter icing has become a staple in the world of cake design. This article will explore the reasons why butter icing is the perfect choice for decorating cakes, as well as provide essential tips, tools, and techniques to help you master this art form.
The smooth texture of butter icing makes it an ideal medium for creating intricate designs and patterns on cakes. Whether you’re looking to create delicate lacework or bold rosettes, butter icing can be easily piped into various shapes with the right tools and techniques. In addition to its aesthetic appeal, butter icing also adds a rich and creamy flavor to any cake, enhancing the overall taste experience for those indulging in your creation.
In this article, we will guide you through each step of decorating a cake using butter icing. From making your own homemade butter icing with quality ingredients to preparing the cake base for decoration, we’ll cover all the necessary aspects that contribute to a beautifully adorned cake. We’ll take you through different piping techniques and advanced designs, ensuring that you have all the knowledge and inspiration needed to create stunning butter icing decorations.
So whether you’re looking to impress your guests at a special occasion or simply want to elevate your baking skills, mastering the art of decorating cakes with butter icing is an endeavor worth pursuing. Get ready to unleash your creativity as we dive into the world of butter icing cake decoration.
Essential Ingredients and Tools for Decorating with Butter Icing
To successfully decorate a cake using butter icing, it is important to have the right ingredients and tools at hand. The following section will provide a list of essential ingredients as well as the necessary tools for achieving beautiful butter icing decorations.
Ingredients:
- Unsalted butter: Using unsalted butter ensures better control over the taste and texture of the icing.
- Powdered sugar: Also known as confectioners’ sugar, powdered sugar gives the icing its sweetness and smooth texture.
- Vanilla extract: Adding a dash of vanilla extract enhances the flavor of the icing.
Tools:
- Stand mixer: A stand mixer is recommended for making butter icing due to its ability to mix ingredients thoroughly and effortlessly.
- Piping bag: A piping bag is essential for creating intricate designs on cakes. It allows for precise control over the flow of icing.
- Various tips: Different tips can be attached to the end of the piping bag to achieve different designs. Some common tips include round tips, star tips, and petal tips.
To ensure successful cake decoration with butter icing, it is crucial to use high-quality ingredients and invest in proper tools. This ensures that the finished result not only looks stunning but also tastes delicious. In addition to these essentials, it may also be helpful to have a turntable for easy maneuvering while decorating and an offset spatula for smoothing out the icing on the cake.
| Ingredients | Tools |
|---|---|
| Unsalted Butter | Stand Mixer |
| Powdered Sugar | Piping Bag |
| Vanilla Extract | Various Tips |
By ensuring you have these ingredients and tools on hand, you will be well-equipped to create beautifully decorated cakes using butter icing.
Step-by-Step Guide on Making Butter Icing from Scratch
Butter icing is a delicious and versatile frosting that can elevate any cake decoration. Making butter icing from scratch is easier than you might think, and it allows you to control the flavor, consistency, and color of your frosting. In this step-by-step guide, we will walk you through the process of making butter icing from scratch, ensuring a smooth and creamy texture every time.
To make butter icing from scratch, you will need the following ingredients:
- 1 cup (2 sticks) of unsalted butter at room temperature.
- 4 cups of powdered sugar.
- 2 teaspoons of vanilla extract.
In addition to these ingredients, you will also need a stand mixer or electric mixer, a spatula or scraper, and a mixing bowl. It’s important to have all the ingredients and tools ready before starting the process to ensure a smooth and efficient preparation.
Here is a detailed step-by-step guide on how to make butter icing from scratch:
- In the mixing bowl, cream the room temperature unsalted butter using the stand mixer or electric mixer until it becomes light and fluffy.
- Gradually add the powdered sugar to the creamed butter while continuing to mix on low speed. Make sure to scrape down the sides of the bowl periodically.
- Once all the powdered sugar is incorporated into the mixture, add in the vanilla extract and mix until well combined.
- Increase the speed of your mixer to medium-high and continue beating for about 3-5 minutes until you achieve a smooth and creamy consistency.
Tips for making perfect butter icing:
- Be cautious not to overmix your butter icing as it can lead to a greasy texture.
- If your butter icing is too stiff, add in small amounts of milk or cream while continuing to mix until desired consistency is reached.
- On the other hand, if your butter icing appears too runny, you can gradually add more powdered sugar until it thickens up.
Making butter icing from scratch is a rewarding and delicious process. By following this step-by-step guide, you can create a rich and creamy frosting that will beautifully complement your cake decoration. Experiment with different flavors by adding extracts or food coloring to customize your butter icing to match any occasion or theme. So go ahead and get creative with your butter icing.
Preparing the Cake for Decoration
Leveling the Cake
Before you can begin decorating your cake with butter icing, it’s important to ensure that the surface is level. This will provide a sturdy and even base for your decorations. To level the cake, you can use a long serrated knife or a cake leveler. Gently slice off any domed or uneven parts of the cake until it is flat on top.
Crumb Coating
To achieve a smooth and professional finish on your butter icing decoration, it is recommended to apply a crumb coat to the cake. A crumb coat is a thin layer of butter icing that helps seal in any loose crumbs and creates a smooth surface for the final decoration.
Start by applying a thin layer of butter icing to the entire cake using an offset spatula or icing smoother. Make sure to cover every part of the cake, including the sides. This initial layer does not need to be perfect; its main purpose is to catch any crumbs and provide an anchor for the final coat.
Once you have applied the crumb coat, refrigerate the cake for at least 30 minutes to allow it to set. This will make it easier to apply the final layer of butter icing without disturbing any crumbs.
Chilling the Cake
After applying the crumb coat and allowing it to set, it’s important to chill the cake before moving on to decorating with butter icing. Chilling will firm up both layers of butter icing and make them less likely to smudge or melt during decoration.
Place the chilled cake in the refrigerator for at least one hour before proceeding with your decorating plans. It’s important that your working space is cool as well, as excessive warmth may cause your butter icing decorations to soften or lose their shape while you work with them.
By incorporating these steps into your preparation process, you’ll create a stable foundation for your butter icing decoration and ensure that your final cake looks both visually appealing and professional. Now, it’s time to move on to the exciting part – mastering different piping techniques with butter icing.
Mastering Different Piping Techniques with Butter Icing
Introduction to Piping Techniques
When it comes to decorating a cake with butter icing, mastering different piping techniques is essential for creating visually stunning designs. Piping involves using a piping bag and various tips to create intricate and precise patterns on the cake’s surface. Whether you’re a beginner or an experienced cake decorator, learning these techniques will elevate your skills and allow you to bring your creative visions to life.
Step-by-Step Instructions for Piping Techniques
- Rosettes: Start by attaching a star-shaped piping tip to the piping bag. Hold the bag at a 90-degree angle to the cake’s surface and apply steady pressure while moving in a circular motion. This will create beautiful rosettes with defined edges.
- Stars: Similar to rosettes, attach a star-shaped tip and hold the piping bag at a 90-degree angle. Apply even pressure as you squeeze out small bursts of icing, tapping the surface slightly before lifting off for each star.
- Shells: Use a shell-shaped piping tip and hold the piping bag at a 45-degree angle. Apply continuous pressure while moving the bag in an S-motion. This technique creates elegant shell borders or can be used to fill large areas of the cake.
- Ruffles: Attach a petal-shaped or curved tip and hold the bag at a 45-degree angle. Apply gentle back-and-forth motions while squeezing out icing, creating lovely ruffle patterns that resemble fabric.
Include corresponding images for each step if possible.
Troubleshooting Common Issues
While mastering different piping techniques with butter icing can be exciting, it’s important to address common issues that may arise:
- Icing consistency: If your icing is too runny, add more powdered sugar gradually until it reaches the desired thickness. On the other hand, if it’s too thick, add a small amount of milk or cream to achieve a smoother consistency.
- Piping bag control: Practice steady pressure on the bag while piping to ensure consistent flow. Experiment with different hand positions and grips to find what feels most comfortable for you.
- Cleaning tips: To avoid clogs or uneven flow, regularly clean your piping tips between uses. Wash them with warm soapy water, or use a small brush to remove any residue.
Remember, practice makes perfect. Don’t be discouraged if your first attempts at these piping techniques aren’t flawless. With time and patience, you’ll improve your skills and create stunning butter icing decorations that will impress both yourself and others.
Creating Intricate Designs and Patterns with Butter Icing
Creating beautiful and intricate designs with butter icing can take your cake decoration to the next level. From basketweave patterns to delicate lacework and stunning ombre effects, there are endless possibilities to explore. In this section, we will dive into advanced butter icing decoration techniques and provide detailed instructions on how to achieve these designs.
One popular technique is creating a basketweave pattern on the cake. Start by applying a crumb coat of butter icing and smoothing it out. Then, using a piping bag fitted with a basketweave tip, pipe vertical lines along the sides of the cake. Take another piping bag with the same tip and pipe horizontally across the vertical lines, alternating over and under each vertical line. Repeat this process until the entire cake is covered in a beautiful basketweave design.
Lacework is another intricate design that can add elegance to any cake. To create lacework with butter icing, use a piping bag with a small round tip and pipe delicate lace-like patterns onto the cake. Start by practicing on parchment paper before attempting it directly onto the cake. Be patient and steady as you pipe out intricate details such as loops, swirls, and filigree motifs.
If you’re looking for a more trendy design, consider trying an ombre effect with butter icing. This technique involves blending various shades of one color from dark to light or transitioning between different colors seamlessly on your cake surface.
To achieve this effect, divide your butter icing into separate bowls and add food coloring gradually to each bowl until you have achieved your desired shades. Use an offset spatula or decorating comb to blend the colors together in smooth strokes on your iced cake.
While creating intricate designs and patterns with butter icing can be challenging at first, with practice and patience, you’ll be able to master these techniques. Remember to experiment with different piping tips, vary pressure while piping for depth and dimensionality, and always start with a well-leveled and crumb-coated cake. Don’t be afraid to get creative and try different designs – the possibilities are endless.
Adding Color and Flair to Butter Icing Decorations
When it comes to decorating a cake using butter icing, adding color is a fantastic way to make your creation stand out. Whether you want vibrant and bold designs or subtle and elegant accents, there are various methods for coloring butter icing that can help you achieve the desired effect.
One popular option is using gel-based food coloring. These gel colors come in a wide range of hues and offer intense pigmentation without altering the consistency of the butter icing. When incorporating gel colors, start with a small amount and gradually add more until you achieve the desired shade.
Remember, a little goes a long way. To ensure even distribution of color, mix the gel with a small amount of vanilla extract or another liquid before adding it to the icing.
If you prefer natural alternatives for coloring, consider using ingredients like fruit or vegetable purees. For example, beetroot powder can create a beautiful pink shade while matcha powder can add a subtle green color. When using natural coloring agents, keep in mind that they may affect the taste and texture of the butter icing slightly. It’s always best to start with small amounts and adjust as needed.
To take your colored butter icing decorations to the next level, don’t be afraid to experiment with different piping techniques and designs. Try combining multiple colors for an ombre effect or create marbled patterns by gently swirling two or more colors together in your piping bag. The possibilities are endless.
Remember, when working with colored butter icing, it’s essential to store any leftover icing properly. If not stored correctly, exposure to air can cause the colors to fade over time. To maintain the vibrancy of your creations, transfer any remaining colored butter icing into an airtight container and refrigerate promptly.
By adding color to your butter icing decorations, you’ll inject personality and flair into your cake creations. Experiment with different shades, techniques, and designs to truly unleash your creativity and evoke a wow factor in your cake decorating endeavors.
Finishing Touches and Tips for Displaying Butter Icing-Covered Cakes
Once you have beautifully decorated your cake with butter icing, there are a few finishing touches you can add to make it truly eye-catching. These extra details will elevate your creation and make it the centerpiece of any celebration. Here are some expert tips for adding those final touches:
- Sprinkles: Sprinkles are a simple yet effective way to add color and texture to your butter icing cakes. You can choose from a wide variety of sprinkles, such as colorful jimmies, metallic dragees, or even themed shapes like hearts or stars. Sprinkle them over the top of the cake or create patterns along the sides for added visual interest.
- Edible Flowers: Decorating with edible flowers adds a touch of elegance to any butter icing-covered cake. Delicate blooms like pansies, violets, and orchids can be used to garnish the top or sides of the cake for a natural and sophisticated look. Make sure to use only organically-grown flowers that are safe for consumption.
- Edible Glitter: For a touch of sparkle and glamour, consider using edible glitter on your butter icing decorations. Edible glitter is available in various colors and adds a shimmering effect to any design. Dust it lightly over floral arrangements or accent specific details on your cake for a magical finish.
When it comes to displaying your butter icing-covered cakes, presentation is key. Here are some tips to ensure that your masterpiece looks as good on display as it does on the plate:
- Cake Stand: Invest in a beautiful cake stand that complements the overall aesthetic of your cake. Choose one with an elegant design or color scheme that enhances the appearance of the butter icing decoration.
- Lighting: Proper lighting can greatly enhance the beauty of your butter icing-decorated cake. Make sure to place your cake in a well-lit area, either natural sunlight or adequate indoor lighting, to showcase the details and colors of the icing.
- Storage: If you need to store your butter icing-covered cake before serving, it’s crucial to do so properly. Place the cake on a covered cake stand or in a cake box and refrigerate it if necessary. Avoid direct contact with plastic wrap, as it may smudge the butter icing decorations.
By giving attention to these finishing touches and display tips, you can ensure that your butter icing-covered cakes not only taste delicious but also look absolutely stunning. Remember, creativity knows no bounds when it comes to decorating with butter icing.
Conclusion
In conclusion, butter icing is an excellent choice for cake decoration due to its popularity and versatility. Not only does it provide a smooth texture and delicious taste to any cake, but it also allows for a wide range of designs and patterns. By following the step-by-step guide on making butter icing from scratch and mastering different piping techniques, anyone can create stunning cake decorations.
Creating intricate designs and patterns with butter icing takes cake decoration to the next level. Techniques like basketweave, lacework, and ombre effects are not only visually appealing but also showcase the artistry that can be achieved with butter icing. With detailed instructions and troubleshooting tips, readers can confidently attempt these advanced techniques.
Adding color and flair to butter icing decorations opens up endless possibilities for creativity. Whether using gel-based or natural options, colored butter icing can transform a simple design into a vibrant masterpiece. The versatility of colored butter icing allows decorators to experiment with various shades and combinations to suit any occasion or theme.
Frequently Asked Questions
How to decorate a cake with buttercream frosting?
Decorating a cake with buttercream frosting involves several steps to achieve a beautifully finished product. First, make sure the cake is cooled completely before beginning any decorations. Then, apply a crumb coat of frosting to seal in any loose crumbs and create an even surface. Once the crumb coat has set, add a thicker layer of buttercream frosting and use a spatula or icing smoother to create smooth sides.
To add decorative touches, use piping bags fitted with various tips to pipe designs, patterns, or borders onto the cake. Additionally, you can add edible decorations such as sprinkles or flowers for an extra touch of visual appeal. Overall, it’s important to practice techniques and experiment with different tools and designs until you achieve the desired result.
How do you cover a cake with butter icing for beginners?
Covering a cake with butter icing is a great starting point for beginners in cake decorating. Begin by preparing your cake, making sure it is completely cooled down before applying any icing. Start with a crumb coat – a thin layer of butter icing that seals in any loose crumbs on the surface of the cake. Allow this coat to set for about 10 minutes before moving on to covering the cake with your final layer of icing.
Use an offset spatula or flat-bladed knife to spread the icing evenly over the top and sides of the cake in smooth strokes, ensuring good coverage all around. Take care not to press too hard or introduce air bubbles into your icing while spreading it. Once covered, you can leave it as is for a simple look or decorate further with piped designs or other embellishments.
Can you put butter icing on top of a cake?
Yes, you can absolutely put butter icing on top of a cake! In fact, many people prefer placing butter icing on top as it helps enhance both flavor and appearance. After cooling your cake completely and removing any loose crumbs from its surface, prepare your desired batch of butter icing. Ensure that it has reached the right consistency – not too runny or stiff.
Using a spatula or an offset spatula, gently spread the butter icing onto the top of the cake in smooth, even strokes. Take care to distribute it evenly and aim for a neat, consistent layer. If desired, you can further decorate the top by piping additional designs, adding decorations like fruits or nuts, or simply leaving it as is. The butter icing will enhance your cake’s taste and provide a delightful finishing touch to your creation.

Welcome to our cake decorating blog! My name is Destiny Flores, and I am the proud owner of a cake decorating business named Cake Karma. Our mission is to provide delicious, beautiful cakes for all occasions. We specialize in creating custom cakes that are tailored specifically to each customer’s individual needs and tastes.


