Decorating a cake can be a fun and creative way to add a personal touch to any special occasion or celebration. Whether it’s a birthday, anniversary, or just a simple gathering with friends, a well-decorated cake can be the centerpiece that steals the show. In this article, we will provide you with simple step-by-step directions on how to decorate a cake that will have your loved ones oohing and aahing over your baking skills.
Cake decoration is not only important for aesthetic reasons but also because it allows you to customize your creation according to your preferences and the occasion at hand. By taking the time to decorate your own cake, you can showcase your creativity and make it truly one-of-a-kind. Plus, it’s often more cost-effective than purchasing professionally decorated cakes from bakeries.
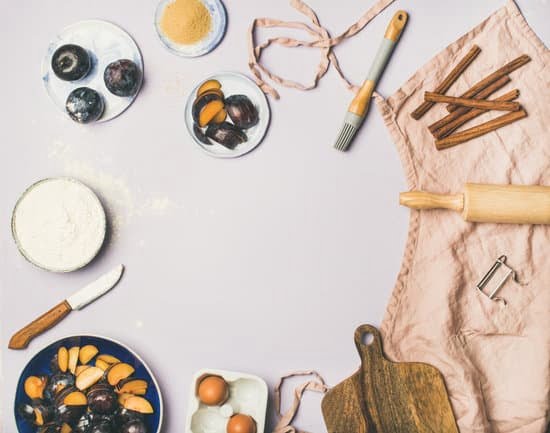
Before diving into the decorating process, it’s essential to gather all the necessary tools and ingredients. Some of the essential tools include spatulas, piping bags, tips for different designs, and various utensils for smoothing frosting. Additionally, you’ll need ingredients for both the cake itself and the frosting. Once you have everything ready at hand, you can proceed with confidence knowing that you won’t have to pause in the middle of decorating because something is missing.
Gather the necessary tools and ingredients
Gathering the necessary tools and ingredients is an essential first step when it comes to decorating a cake. Having the right tools on hand will make the process much smoother and more enjoyable, while having all the ingredients ready will ensure you have everything you need to create a delicious and beautiful cake. Here is a list of essential tools and ingredients to gather before you start:
Tools:
- Spatulas: A variety of spatulas in different sizes will help with tasks like spreading frosting, smoothing surfaces, and applying decorative elements.
- Piping bags: These are essential for intricate designs and precision piping. Make sure to have both disposable and reusable piping bags on hand.
- Piping tips: A collection of piping tips in various shapes and sizes will allow you to create different patterns, borders, and decorations.
- Offset spatula: This tool is great for leveling cakes and achieving smooth finishes on the sides.
- Cake turntable: While not absolutely necessary, a cake turntable can make decorating easier by allowing you to rotate the cake as needed while working on it.
- Pastry brushes: These will come in handy for brushing simple syrups or glazes onto your cakes.
Ingredients:
- Cake mix or homemade cake batter ingredients: Depending on your preference, gather all the necessary ingredients for your chosen cake recipe. This could include flour, sugar, eggs, baking powder, milk, butter, extracts (such as vanilla), etc.
- Frosting ingredients: Gather the ingredients needed for your chosen frosting recipe or alternatives like buttercream or cream cheese frosting. This could include powdered sugar, unsalted butter or cream cheese, vanilla extract, milk or heavy cream, etc.
Remember that specific recipes may call for additional tools or ingredients depending on the design or technique you plan to use. Take some time to review your chosen recipe(s) thoroughly before gathering all your supplies. By being prepared with all the necessary tools and ingredients up front, you will save time and have a more enjoyable cake decorating experience.
Prepare the cake and frosting
Preparing the cake and frosting is a crucial step in the cake decorating process. This section will guide you through the necessary steps to bake a delicious cake and make homemade frosting. Whether you’re a beginner or an experienced baker, these step-by-step instructions will help you achieve a moist and flavorful cake that serves as a perfect canvas for your decorative designs.
Step-by-Step Instructions for Baking the Cake
- Start by preheating your oven to the specified temperature mentioned in your recipe.
- Grease and flour the cake pans to prevent sticking. You can also line them with parchment paper for easier removal of the cakes later.
- In a mixing bowl, combine all the dry ingredients such as flour, sugar, baking powder, baking soda, and salt. Use a whisk or fork to ensure they are evenly distributed.
- In another bowl, mix together the wet ingredients such as eggs, oil, vanilla extract, milk, or any other liquid specified in your recipe.
- Gradually add the wet ingredients to the dry ingredient mixture while continuously stirring until well-combined. Be careful not to overmix as it may result in a dense cake texture.
- Divide the batter evenly between the prepared cake pans and smooth out the tops with a spatula.
- Place the pans in the preheated oven and bake according to your recipe’s instructions. Remember to rotate them halfway through baking for even cooking.
- Check if the cakes are done by inserting a toothpick into the center – it should come out clean or with just a few crumbs clinging to it.
- Once baked, let the cakes cool in their pans for about 10 minutes before transferring them onto wire racks to cool completely.
Recipe for Homemade Frosting or Alternatives
- In a mixing bowl, beat softened unsalted butter until creamy using an electric mixer on medium speed.
- Gradually add powdered sugar, about one cup at a time, while continuing to beat on low speed until fully incorporated.
- Add vanilla extract or any other flavorings of your choice and a pinch of salt. Mix well.
- If the frosting is too thick, add a tablespoon of milk or cream at a time until desired consistency is reached.
- For chocolate frosting, melt some chocolate and let it cool slightly before adding it to the butter mixture.
- Once the cakes have completely cooled down, spread a generous amount of frosting between each layer using a spatula or an offset spatula.
- Crumb coat the entire cake by applying a thin layer of frosting all over its surface to seal in any crumbs. Chill the cake in the refrigerator for 15-30 minutes for the crumb coat to set before proceeding with further decoration.
Preparing the cake and homemade frosting from scratch allows you complete control over its taste and quality. However, if you prefer convenience or are short on time, store-bought cakes and frostings can be used as alternatives for this step. Experiment with different flavors and combinations to find what works best for your preferences or the occasion you’re celebrating.
Level and frost the cake
Leveling and frosting the cake is an important step in cake decoration as it ensures a stable foundation for the design and provides a smooth canvas for further decorations. Here are some tips and techniques to help you level and frost your cake like a pro.
Tips for Leveling the Cake Layers
To achieve an evenly layered cake, it is essential to level the tops of each cake layer. Here’s how you can do it:
- Start by placing the cooled cakes on a flat surface. If the cakes have domed tops, gently slice off the excess using a long serrated knife held horizontally.
- Use a cake leveler or place toothpicks around the sides of the cake at an even height as a guide for cutting.
- Carefully cut through each layer following the toothpick guide or using the flat edge of your knife, ensuring that you maintain an even thickness throughout.
- Remove any loose crumbs from each layer before proceeding with frosting.
Technique for Applying Smooth and Even Frosting
Now that your cake layers are leveled, it’s time to frost them. Follow these steps for a smooth and even finish:
- Place one layer of cake on a serving plate or turntable. Spread a thin layer of frosting on top using an offset spatula or butter knife to create a “crumb coat.” This initial coat helps seal in any loose crumbs.
- Apply more frosting to cover the entire top surface of the crumb-coated layer. Use an offset spatula to spread it evenly, working from the center outward in gentle strokes.
- Add additional layers if desired, repeating steps 1 and 2 for each layer until you have stacked all your cakes.
- After stacking, apply another thin layer of frosting all over the sides and top of the stacked cakes as your final coat. Smooth out any uneven spots with the spatula.
- To achieve a professional-looking finish, you can use a bench scraper or icing smoother to go around the cake’s sides, smoothing and leveling the frosting.
By following these tips and techniques, you can ensure that your cake layers are leveled and your frostings are applied evenly for a beautifully decorated cake.
Choose a design or theme
Choosing a design or theme is an important step in cake decoration as it sets the tone for the entire cake and enhances its visual appeal. When deciding on a design or theme, consider the occasion for which the cake is being made and the personal preferences of the recipient. Here are some suggestions to help you choose a design that suits your needs:
- Occasion-based designs: For special occasions like birthdays, weddings, or anniversaries, consider incorporating elements that reflect the theme of the event. For example, a birthday cake can be adorned with candles and sprinkles, while a wedding cake can feature elegant floral decorations.
- Personalized designs: To add a personal touch to your cake, think about the recipient’s hobbies, interests, or favorite colors. Incorporating personalized elements shows thoughtfulness and makes the cake more meaningful. For example, if the recipient loves music, you can decorate the cake with musical notes or instruments.
- Trendy designs: Stay updated with current cake decoration trends to create visually appealing cakes. Research popular designs online or get inspiration from social media platforms like Pinterest or Instagram. These platforms showcase various creative ideas that you can incorporate into your own cake design.
Additionally, when choosing a design or theme, it is essential to consider your own skill level and available time. If you are a beginner in cake decoration or have limited time, opt for simpler designs that still look stunning.
| Popular Themes | Trending Designs |
|---|---|
| Baby shower | Geode cakes |
| Graduation | Drip cakes |
| Valentine’s Day | Naked cakes |
| Wedding | Watercolor cakes |
Remember, the design or theme you choose should match your skill level and resources. Don’t be afraid to let your creativity shine and experiment with different ideas. After choosing a design, it’s time to move on to the next step – planning and sketching the design.
Plan and sketch the design
Planning and sketching the design of your cake is an important step in the decorating process. Taking the time to visualize and create a sketch or template will help ensure that your final creation turns out just as you envisioned. Here are some guided steps to help you plan and sketch the design for your cake:
- Consider the occasion or theme: Before starting your sketch, think about the occasion or theme for which you are decorating the cake. Is it a birthday party, wedding, or holiday celebration? Knowing this will help you determine what elements to incorporate into your design.
- Gather inspiration: Look for inspiration from various sources such as magazines, books, online platforms, or even nature. Pinterest and Instagram are great platforms where you can find countless ideas for cake designs. Take note of specific colors, patterns, shapes, or decorations that catch your eye.
- Sketching process: Start by drawing a rough outline of the shape and size of your cake on a piece of paper or use digital software if you prefer. Then begin adding details such as borders, layers, and any other features specific to your chosen design. It’s okay if your sketch isn’t perfect – use it as a guide to refer back to throughout the decorating process.
- Create a template (optional): For more intricate designs, you may want to create a template using parchment paper or acetate sheets. Trace your sketch onto these materials and cut them out carefully so that you can easily transfer the design onto the cake later.
- Make adjustments: Take a step back and analyze your sketch or template from different angles to see if any adjustments need to be made. This is your opportunity to refine any areas that may not look quite right or add extra details that would enhance the overall look of your cake.
Remember that planning and sketching allows room for creativity while providing structure for execution. Don’t be afraid to experiment with different ideas and modify your design as you go. The sketch serves as a rough roadmap, but being open to making changes along the way can lead to unexpected and delightful results.
Decorate the cake with simple techniques
Once you have prepared and leveled your cake, it’s time to bring out your creativity and decorate it with simple techniques. Decorating a cake doesn’t have to be complicated or intimidating – even beginners can create stunning designs by following these step-by-step directions.
One of the simplest and most commonly used techniques is piping. Piping involves using a piping bag fitted with a nozzle to create various designs on the surface of the cake. To begin, fill your piping bag with frosting and twist the top to ensure it stays secure.
Start by practicing basic shapes like dots, lines, and swirls on a piece of parchment paper or a separate surface before moving onto the actual cake. Remember to apply consistent pressure on the bag for even results. With practice, you can move on to more intricate designs like flowers or writing.
Another popular technique is creating rosettes. Rosettes are beautiful flowers made entirely out of frosting that add an elegant touch to any cake. To make rosettes, attach a large star-shaped nozzle to your piping bag filled with frosting. Starting from the center of your cake, apply gentle pressure while swirling outward in a circular motion. As you reach the outer edge of the desired size for your rosette, release pressure and gently lift up the nozzle.
If you want to elevate your cake decoration skills further, try making buttercream flowers. Buttercream flowers are delicate floral designs made using different piping nozzles and techniques. Some common buttercream flower designs include roses, daffodils, and sunflowers. Each flower requires specific nozzles and movements, but with practice and patience, you can create stunning floral displays that will impress any crowd.
Remember, when decorating with simple techniques, it’s important not to get overwhelmed or compare yourself to professional bakers. The goal is to have fun and show off your creativity through beautifully decorated cakes. So don’t be afraid to experiment and try different techniques – you never know what amazing design you might come up with.
Add finishing touches
Adding the finishing touches to a decorated cake can truly elevate its appearance and make it stand out. These final details can turn a simple cake into a stunning masterpiece. There are countless options for adding these finishing touches, depending on personal preferences and the occasion. Here are some ideas to consider when putting those final touches on your cake.
One option for adding visual interest and texture to your cake is to incorporate edible flowers. Edible flowers not only provide a beautiful pop of color but also add a delicate, natural touch to the overall design. You can choose from a variety of edible flowers like pansies, marigolds, or violets, depending on your taste and the theme of your cake.
Another popular finishing touch is the use of sprinkles or edible glitter. Sprinkles come in a wide range of colors, shapes, and sizes, allowing you to customize the look of your cake. Whether you prefer classic rainbow sprinkles or more sophisticated metallic dragees, sprinkle them over the top or around the edges of the cake for an added festive and celebratory touch.
To enhance the presentation even further, consider adding other decorative elements such as chocolate curls or shavings. These elegant decorations can be carefully arranged on top of the cake in various patterns or used as borders around the sides. Not only do chocolate curls add texture and depth to the design, but they also provide an irresistible element for chocolate lovers.
Remember to trust your instincts when adding finishing touches and have fun with it. Your creativity knows no bounds when it comes to decorating a cake, so feel free to experiment with different combinations of edible decorations to achieve your desired look. The goal is to create a visually pleasing masterpiece that will delight both eyes and taste buds alike.
Overall, adding finishing touches allows you to put your own personal stamp on the decorated cake while enhancing its appearance and appeal. By paying attention to small details like edible flowers, sprinkles, or chocolate curls, you can take your cake decoration skills to the next level and leave a lasting impression on your guests. So, let your imagination run wild and have fun exploring all the possibilities for these final touches.
Tips for cake storage and transportation
Cake storage and transportation are important considerations when it comes to successfully showcasing your beautifully decorated cake. Whether you’re preparing for a special occasion or delivering the cake to someone else, it’s crucial to ensure that the cake remains fresh and intact. Here are some tips to help you with cake storage and transportation:
Cake Storage
- After decorating the cake, make sure it has completely cooled down before storing it.
- Place the cake on a sturdy, flat surface such as a baking tray or cardboard cake board.
- Cover the entire cake with plastic wrap or a plastic dome to prevent any air exposure.
- If you’re concerned about smudging delicate decorations, consider using toothpicks to tent the plastic wrap above the highest point of the cake.
- Store the covered cake in a cool, dry place away from direct sunlight, extreme temperatures, and humidity.
Cake Transportation
- For local transport, use a sturdy cake carrier or a cardboard box with proper support inserts to secure your decorated cake in place during transit.
- To prevent slipping or movement of the cake inside the carrier or box, place non-slip material such as foam liners or anti-skid mats at the base.
- If possible, refrigerate your decorated cake before transport to firm up any frosting or filling layers that could shift during transit.
- Drive cautiously and avoid sudden stops or sharp turns while transporting your decorated cake.
- Consider placing ice packs around the edges of the container (but not directly touching the cake) if you are transporting it in warm weather.
With these tips in mind, you can confidently store and transport your beautifully decorated cake without compromising its appearance or taste. Remember to handle your creation gently throughout storage and travel to ensure it arrives at its destination in perfect condition.
Conclusion
In conclusion, decorating a cake can be a fun and rewarding experience. By following the step-by-step directions provided in this article, you can create beautiful and delicious cakes that are sure to impress your friends and family.
The importance of cake decoration cannot be overstated. A well-decorated cake adds an extra element of beauty and creativity to any occasion, whether it’s a birthday party, wedding celebration, or just a simple gathering with loved ones. Not only does it enhance the visual appeal of the cake, but it also allows you to express your personal style and show off your baking skills.
One of the benefits of decorating your own cake is the ability to customize it according to your preferences. You can choose a design or theme that suits the occasion or reflects your personality. With the endless possibilities provided by different techniques, decorations, and flavors, every cake you decorate will be unique and special.
As you embark on your cake decorating journey, remember to have fun and be open to experimenting with different designs and techniques. Don’t be afraid to try something new or put your own twist on traditional methods. The most important thing is to enjoy the process and take pride in the final result.
So gather your tools and ingredients, follow the step-by-step directions provided in this article, and let your creativity shine as you decorate beautiful cakes for all occasions. Happy decorating.
Frequently Asked Questions
How do you decorate a cake in a simple way?
Decorating a cake in a simple way can be achieved by focusing on minimalistic designs and using basic techniques. One approach is to opt for a clean and smooth frosting on the cake, such as a buttercream or ganache, ensuring that the surface is leveled and even. To add some visual interest, consider using a piping bag with a simple round tip to create borders or rosettes around the edges.
Another easy decoration idea is to sprinkle some colorful edible confetti or use edible flowers or fruit slices as garnish. By keeping the design clean and straightforward, you can achieve an elegant and effortless look for your cake.
How to make icing for a cake for beginners?
Making icing for a cake as a beginner can be straightforward if you stick to a few basic steps. The most common type of icing used for cakes is buttercream icing, which involves creaming softened butter with powdered sugar until light and fluffy. Start by beating the butter alone until it becomes creamy, then gradually add in the powdered sugar while continuing to beat until well blended.
For added flavor, you can include vanilla extract or other extracts like almond or lemon juice. If the consistency is too thick, simply add small amounts of milk or cream until it reaches your desired spreadable texture. Remember to taste along the way and adjust the sweetness or flavor as needed.
What are the 3 tips for preparing to decorate a cake?
When preparing to decorate a cake, there are three essential tips to keep in mind. First, ensure that your workspace is clean and organized before starting so that you have all your tools readily available. This includes gathering any necessary piping bags, tips, spatulas, and decorating tools beforehand so that you don’t have to search for them mid-decorating process. Second, make sure that your cake is properly cooled before applying any frosting or decorations; otherwise, the heat will cause the frosting to melt or slide off.
Lastly, take some time to plan out your design ahead of time by sketching it out on paper or visualizing it in your mind. This will help you stay focused and create a cohesive design without making too many last-minute changes. By following these three tips, you can approach decorating a cake with confidence and achieve a professional-looking result.

Welcome to our cake decorating blog! My name is Destiny Flores, and I am the proud owner of a cake decorating business named Cake Karma. Our mission is to provide delicious, beautiful cakes for all occasions. We specialize in creating custom cakes that are tailored specifically to each customer’s individual needs and tastes.

