Butterfly-shaped cakes have become increasingly popular and are often the centerpiece of special occasions such as birthday parties, baby showers, and weddings. Their whimsical charm and vibrant colors bring joy and excitement to any celebration. If you’re looking for a fun and creative way to delight your loved ones, decorating a butterfly-shaped cake is the perfect activity.
Decorating a butterfly-shaped cake allows you to unleash your creativity and add personal touches that can make it truly unique. Whether it’s experimenting with different flavors, colors, or intricate designs, the possibilities are endless when it comes to decorating this delightful treat. Not only will you impress your guests with the visually stunning cake, but the process itself can be incredibly rewarding.
In this article, we will guide you on how to decorate a butterfly-shaped cake step by step. We’ll provide tips on gathering all the necessary supplies and where to find them both online and in-store.
Additionally, we’ll walk you through baking the perfect cake, carving it into a butterfly shape with clean lines, frosting techniques using buttercream frosting or fondant, adding vibrant colors using food coloring or edible paints, working with fondant for additional decorative elements, and applying finishing touches that will elevate your creation.
So get ready to dive into the world of cake decorating and let your imagination soar as we embark on this exciting journey of creating an exquisitely decorated butterfly-shaped cake.
Gathering the Supplies
To successfully decorate a butterfly-shaped cake, it is essential to gather all the necessary supplies. Here is a comprehensive list of what you will need:
- Cake mix: Choose any flavor that suits your preference, ensuring that you have enough to bake a large enough cake for the butterfly shape.
- Food coloring: Select a variety of vibrant colors to bring life to the butterfly wings and details.
- Piping bags: These are essential for applying various frostings and creating intricate designs on the cake.
- Various tips: Invest in a variety of tips with different shapes and sizes, such as round, star, or petal tips, to achieve versatile decorative effects.
- Fondant: This pliable icing is perfect for creating additional decorative elements such as antenna or delicate flowers.
- Edible decorations: Consider using edible pearls, glitter, or edible ink pens for adding extra details and embellishments to your butterfly cake.
When searching for these supplies, you can find them at local baking supply stores or conveniently order online from specialized retailers or general e-commerce platforms like Amazon or Walmart. Shopping online allows access to a wide range of options and provides an opportunity to read reviews before making your purchase decision.
Having all the necessary supplies ready will ensure a smooth and enjoyable experience when decorating your very own butterfly-shaped cake. Let’s dive into the next section where we discuss baking the perfect butterfly cake.
Baking the Perfect Butterfly Cake
Once you have gathered all the necessary supplies, it’s time to move on to baking the perfect butterfly cake. Follow these step-by-step instructions for preparing the cake batter and tips for ensuring even baking and perfect moisture.
First, preheat your oven to the recommended temperature stated on the cake mix packaging. While the oven is preheating, prepare your desired cake mix according to the instructions. For a vibrant and eye-catching butterfly cake, consider using a white or yellow cake mix that can easily be colored.
Before pouring the batter into your prepared cake pans, make sure they are properly greased and lined with parchment paper. To achieve an even bake, ensure that you distribute the batter evenly between both pans. This will help avoid one side of your butterfly cake being larger or denser than the other.
Place your filled pans in the oven and set a timer according to the suggested bake time on your cake mix packaging. Keep a close eye on it during baking to avoid overbaking or underbaking. You can use a toothpick or skewer to test if your cakes are fully baked by inserting it into the center of each cake – if it comes out clean with no crumbs sticking to it, then your cakes are done.
Allow your baked cakes to cool completely before moving onto carving them into a butterfly shape. This will prevent them from crumbling or breaking while you work with them. Once cooled, gently remove them from their pans and place them on a wire rack to cool completely. Now you’re ready for the next step – carving.
Carving the Butterfly Shape
Carving the Cake
Once you have baked your butterfly-shaped cake and it has cooled completely, it’s time to start carving it into the desired shape. There are two common methods for carving a butterfly cake: using a template or freehand.
If you prefer a more precise shape, consider finding a butterfly template online. Print it out and place it on top of the cake. Gently trace around the template using a toothpick or a small knife, making sure to leave enough space for the head and antennas of the butterfly. This will serve as your guide for carving.
For those feeling confident in their artistic abilities, freehand carving can result in unique and personalized shapes. Start by visualizing the butterfly shape and outline it directly onto the cake with a toothpick or a small knife. Remember, you can always make adjustments as you go along, so don’t worry about getting everything perfect right away.
Creating Clean Lines and Smooth Edges
To achieve clean lines and smooth edges on your carved butterfly cake, there are a few helpful tips to keep in mind. First, use a serrated knife to carefully cut along the traced lines or carve along your freehand outline. Make sure to apply gentle pressure as you work your way through the cake.
After carving, gently brush away any excess crumbs from the surface of the cake using a pastry brush or clean kitchen towel. This will ensure that your final frosting layer is smooth and crumb-free.
Next, use an offset spatula or straight-edged scraper to apply a thin layer of buttercream frosting all over the carved cake. This initial layer is called the crumb coat and helps to seal in any loose crumbs before applying the final layer of frosting.
Once you’ve applied the crumb coat, refrigerate the cake for about 15 minutes to allow it to set slightly. Then, apply another thick layer of buttercream frosting, using a smoother or offset spatula to achieve a smooth finish. Take your time when spreading the frosting and continue to smooth out any imperfections.
Remember, practice makes perfect, so don’t be discouraged if your first attempt at carving a butterfly-shaped cake isn’t flawless. The most important thing is to have fun and enjoy the creative process.
Decorating Variations
While the basic shape of a butterfly cake is already beautiful on its own, you can take your decoration to the next level by adding extra elements or details. For instance, you can pipe decorative borders around the edges of the wings using a piping bag fitted with different tips. Experiment with various designs and patterns to create unique textures and effects.
Additionally, consider using edible glitter or pearl accents to add shimmer and enhance the overall look of your butterfly cake. These can be gently sprinkled onto the wings or strategically placed for a more delicate touch.
If you’re feeling adventurous, you can also use edible ink pens to draw intricate details on your butterfly wings or even add some texture with small fondant flowers or butterflies as embellishments.
Remember that decorating a butterfly-shaped cake is an opportunity for creativity and personal expression. Have fun exploring different techniques and ideas while making sure to showcase your own style through vibrant colors, elegant decorations, and unique finishing touches.
Buttercream Frosting Techniques
One of the most important aspects of decorating a butterfly-shaped cake is the buttercream frosting. Buttercream not only serves as a delicious filling and frosting for your cake, but it also provides a smooth canvas for adding decorative details. There are several different techniques you can use to achieve beautiful results with your buttercream frosting.
- Vanilla Buttercream: Vanilla buttercream is a classic choice that complements any flavor of cake. To make vanilla buttercream, start by creaming together softened unsalted butter and powdered sugar until light and fluffy. Then, add in vanilla extract and a pinch of salt for added flavor. You can also customize the consistency of your vanilla buttercream by adjusting the amount of powdered sugar or adding milk or heavy cream if needed.
- Chocolate Buttercream: If you’re looking for something rich and indulgent, chocolate buttercream is the way to go. Start by melting semi-sweet or dark chocolate and letting it cool slightly. Cream together softened unsalted butter and powdered sugar until light and fluffy, then add in the melted chocolate, cocoa powder, vanilla extract, and a pinch of salt. Adjust the consistency as needed with milk or heavy cream.
- Flavored Buttercreams: Another fun option is to experiment with flavored buttercreams to add extra depth and dimension to your butterfly-shaped cake. You can incorporate flavors like strawberry, lemon, mint, or even espresso into your buttercream by adding extracts or fruit purees during the mixing process. Just be mindful that these additions may affect the consistency of your frosting, so adjust accordingly.
To crumb coat and frost your butterfly-shaped cake with buttercream:
- Step 1: Place your cooled cake on a rotating cake stand for easier frosting application.
- Step 2: Start by applying a thin layer of buttercream all over the surface of the cake using an offset spatula. This is called the crumb coat and helps seal in any loose crumbs.
- Step 3: Once the crumb coat is in place, refrigerate the cake for about 15 minutes to allow the buttercream to firm up.
- Step 4: After chilling, apply a thicker layer of buttercream to achieve a smooth and even finish. Use the offset spatula or a bench scraper to create clean lines and smooth edges on the sides of the cake.
- Step 5: For added texture, you can use a piping bag fitted with different tips to create borders, rosettes, or other decorative elements on your butterfly-shaped cake.
Remember, practice makes perfect when it comes to buttercream frosting techniques. Don’t be afraid to experiment and get creative with different piping techniques and designs. The final result will be a stunning butterfly-shaped cake that is as delicious as it is beautiful.
Adding Vibrant Colors
Butterfly-shaped cakes are not only delightful to look at, but they also provide the perfect canvas for adding vibrant and eye-catching colors. Adding vibrant colors to your butterfly cake can take it from ordinary to extraordinary, making it the centerpiece of any celebration. With a few simple techniques and some creativity, you can create a stunning masterpiece that will impress both young and old alike.
Techniques for Adding Color
When it comes to adding vibrant colors to your butterfly cake, there are several techniques you can try. One popular method is using food coloring to tint your buttercream frosting or fondant. You can use gel or liquid food coloring depending on your preference. Gel food coloring tends to be more concentrated, allowing you to achieve bold and intense colors. Liquid food coloring, on the other hand, provides lighter shades with more pastel tones.
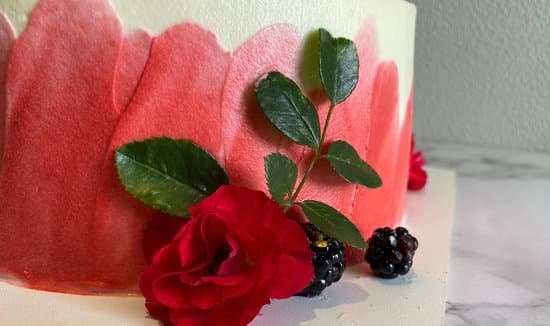
To achieve gradient effects on the butterfly wings, you can use a brush or an airbrush tool to blend different shades of color together. Start by applying the darkest shade at the edges of the wings and gradually blend it with lighter shades towards the center. This technique creates a beautiful ombre effect that adds depth and dimension to your cake design.
Blending Shades Seamlessly
To ensure that your colors blend seamlessly together on your butterfly cake, it’s important to work quickly while the frosting or fondant is still wet. This allows for easy blending without leaving harsh lines or streaks between different shades. It may be helpful to have a damp paintbrush or sponge nearby to gently blend and soften any edges as needed.
Another way to add vibrant color is by using edible paints. These paints are specially designed for use on cakes and provide an intense burst of color with just a few brushstrokes. Edible paints offer more precision compared to traditional food coloring, allowing you to create intricate patterns, details, or even personalized messages on your butterfly cake.
By incorporating vibrant colors into your butterfly-shaped cake, you can create a visually stunning masterpiece that is sure to impress. Whether you choose to use food coloring to tint your buttercream frosting or fondant or experiment with edible paints for more intricate designs, adding vibrant colors will bring your butterfly cake to life. Get ready to showcase your creativity and create a cake that will leave everyone in awe of both its appearance and delicious taste.
Working with Fondant
Fondant is a versatile and popular choice for adding decorative elements to a butterfly-shaped cake. It allows for intricate designs and smooth finishes, giving the cake a professional look. In this section, we will guide you on how to work with fondant to create additional decorative elements for your butterfly cake.
To start working with fondant, you will need a few supplies including powdered sugar or cornstarch for dusting, rolling pin, fondant smoother, sharp knife or pizza cutter for cutting, and silicone molds or shaping tools for creating different shapes and patterns. It is important to ensure that your surface and tools are clean and dry before beginning.
- Rolling: Dust your work surface with powdered sugar or cornstarch to prevent sticking. Roll out the fondant using a rolling pin to your desired thickness.
- Cutting: Use a sharp knife or pizza cutter to cut out the desired shapes from the rolled-out fondant. You can use cookie cutters or templates as guides for more precise shapes.
- Shaping: If you want to create three-dimensional elements such as flowers or butterflies, use silicone molds or shaping tools to shape the fondant pieces according to your design. Press the fondant into the mold or shape it freehand using your fingers.
- Attaching: To attach the fondant decorations onto the buttercream-frosted cake, lightly brush the back of each piece with water or edible glue. Gently press it onto the cake at your desired location.
Remember, working with fondant requires practice and patience. Don’t be afraid to experiment with different shapes and designs until you achieve the desired look for your butterfly-shaped cake. The possibilities are endless.
| Steps | Description |
|---|---|
| Rolling | Roll out fondant to desired thickness on a powdered sugar or cornstarch-dusted surface. |
| Cutting | Use sharp knife or pizza cutter to cut out desired shapes from rolled-out fondant. |
| Shaping | Shape the fondant using silicone molds or shaping tools according to your design. |
| Attaching | Brush back of fondant pieces with water or edible glue and press onto the cake. |
Finishing Touches
In this section, we will explore the various options for adding the finishing touches to your butterfly-shaped cake. These final details will not only enhance the visual appeal of your creation but also make it truly unique and memorable. Let’s dive in.
One way to add a touch of sparkle and glamour to your butterfly cake is by using edible glitter or shimmer dust. These decorative toppings come in a variety of colors and can be lightly dusted over the surface of the cake or selectively applied to specific areas for a more dramatic effect. Edible pearls or dragees can also be used to create an elegant and luxurious look.
For those who are confident in their artistic skills, edible ink pens offer a fantastic opportunity to add intricate details and personalization to the butterfly design. These pens come in different colors and allow you to write messages or draw intricate patterns directly on the cake surface.
To elevate the overall presentation of your butterfly-shaped cake, consider using a cake stand or pedestal. Not only will this provide stability for your cake but it will also showcase it as a centerpiece during special occasions like birthdays or parties. Alternatively, you can create a garden-themed display by placing real flowers around the base of the cake or on top as a delightful accompaniment.
Lastly, remember that creativity knows no bounds when it comes to decorating cakes. Think outside of the box and consider incorporating unconventional elements such as edible flowers, small toys, or personalized cake toppers that reflect the occasion you are celebrating.
| Decoration Option | Description |
|---|---|
| Edible Glitter | Adds sparkle and glamour; available in different colors. |
| Edible Pearls/Dragees | Creates an elegant look; can be scattered or applied selectively. |
| Edible Ink Pens | Allows for intricate drawings and personalized messages on the cake. |
| Cake Stand/Pedestal | Elevates the presentation; serves as a centerpiece. |
| Real Flowers | Garden-themed display; adds a delightful touch. |
With these final touches, your butterfly-shaped cake will truly come to life and become a showstopper at any event. Don’t be afraid to let your imagination run wild and experiment with different decorations to make it uniquely yours. Now that we’ve covered all aspects of decorating a butterfly-shaped cake, it’s time to bring it all together in the concluding section.
Conclusion
In conclusion, decorating a butterfly-shaped cake can be a delightful and imaginative activity that brings joy to special occasions. By following the step-by-step instructions outlined in this article, anyone can create a stunning butterfly cake with ease. The process begins with gathering all the necessary supplies, which can be found both in-store and online. From there, baking the perfect cake and carving it into a butterfly shape are crucial steps in achieving a professional finish.
The next stages involve working with buttercream frosting and adding vibrant colors to bring the butterfly wings to life. Readers are encouraged to explore various buttercream flavors and experiment with different techniques for achieving beautiful color effects. Working with fondant is another skill that can elevate the design of the butterfly cake, allowing for the creation of intricate details such as antenna or delicate flowers.
Finishing touches play an important role in making the butterfly cake truly spectacular. Edible glitter, pearls, or edible ink pens can add exquisite details while presentation ideas such as using a cake stand or real flowers as an accompaniment can enhance the visual impact. Lastly, readers are invited to share their creativity by posting their decorated butterfly cakes on social media platforms using a specific hashtag for community engagement and inspiration.
Frequently Asked Questions
How do you cut a cake in the shape of a butterfly?
To cut a cake in the shape of a butterfly, you will need to start with a rectangular or square-shaped cake. Begin by cutting diagonally from one corner to the opposite corner, creating two triangular halves. These triangles will form the wings of the butterfly. Next, take one of the triangular halves and cut it in half lengthwise, so you now have two smaller triangles.
These will be used as the top part of each wing. Place these smaller triangles on top of the larger ones, positioning them at an angle to create a visually appealing butterfly shape. With careful precision and a sharp knife, gently cut away any excess cake around the pattern to refine and define the butterfly shape. Remember to handle and transfer each piece delicately to maintain its integrity.
How do you put butterflies on a cake?
Putting butterflies on a cake can be done using different methods depending on your preferences and resources available. One simple approach is to use pre-made edible butterfly decorations that can be purchased from baking supply stores or online retailers specializing in cake decorating supplies. These edible butterflies are typically made from thin sheets of icing or wafer paper that have been shaped into butterfly designs and delicately colored with food-safe dyes or paints.
Gently press these edible decorations onto your fully iced cake at desired locations, arranging them in a pleasing pattern or design. Another option is to use icing piped through small round tips to create buttercream butterflies directly onto the surface of your cake.
How do you put a butterfly cake topper on?
When putting a butterfly cake topper on a cake, there are several ways to ensure it is properly secured and visually appealing. If your butterfly cake topper has a flat base, like those made from plastic or molded sugar, placing it directly on top of the finished cake should suffice without any additional support needed. However, if the base is curved or requires extra stabilization due to its weight or size, you may want to consider using toothpicks or thin dowels inserted into the cake to help hold it upright.
Simply place the topper onto the desired position on the cake, and if needed, carefully push toothpicks or dowels through the base of the topper into the cake until it stands firmly upright. Be cautious not to push them too far into the cake to avoid damaging its structural integrity or creating a hazard while cutting and serving.

Welcome to our cake decorating blog! My name is Destiny Flores, and I am the proud owner of a cake decorating business named Cake Karma. Our mission is to provide delicious, beautiful cakes for all occasions. We specialize in creating custom cakes that are tailored specifically to each customer’s individual needs and tastes.

