Are you wondering how to decorate a 3 tier cake and create a stunning centerpiece for any special occasion? Look no further.
In this article, we will explore the essential tools and materials needed, along with a step-by-step guide to leveling and stacking the tiers. We’ll also cover choosing the right frosting and icing techniques, creating unique decorations for each tier, achieving a flawless fondant covering, adding personalized elements, troubleshooting decoration challenges, and presenting the finished product in style.
Three-tier cakes are not only a delicious treat but also a beautiful work of art that can elevate any celebration. From weddings to birthdays to anniversaries, the grandeur and elegance of a 3 tier cake make it the focal point of any event. Whether you are a beginner or an experienced baker looking to enhance your skills, this comprehensive guide will provide you with all the necessary information to create your own masterpiece.
In the following sections, we will delve into everything you need to know about decorating a 3 tier cake. From leveling and stacking the tiers to choosing the right frosting and creating stunning decorations, we will help you achieve professional-quality results. So roll up your sleeves, gather your tools, and let’s get ready to decorate a show-stopping 3 tier cake that will impress your guests and leave them in awe of your baking prowess.
Essential Tools and Materials for Decorating a 3 Tier Cake
When it comes to decorating a 3 tier cake, having the right tools and materials is crucial to achieving a professional and polished look. Here are some essential items you will need to successfully decorate a 3 tier cake:
1. Cake boards and dowels: To properly support each tier, you will need cake boards that are the same size as each tier of your cake. Additionally, wooden or plastic dowels will be needed to provide extra support when stacking the tiers on top of each other.
2. Offset spatulas: These angled spatulas are perfect for applying frosting and smoothing it out on the sides of your cake tiers.
3. Piping bags and tips: Whether you’re using buttercream or royal icing, piping bags and various tips will allow you to create intricate designs and details on your cake.
4. Fondant tools: If you plan on covering your cake with fondant, you’ll need tools such as a rolling pin, fondant smoother, and cutting wheel to help with the application and shaping of the fondant.
5. Edible decorations: Depending on your design, you may want to incorporate edible elements such as fresh flowers, fruit, or edible pearls to enhance the overall look of your 3 tier cake.
It’s important to have all these tools and materials ready before starting to decorate your 3 tier cake in order to ensure a smooth and efficient process. By having everything prepared ahead of time, you can focus on bringing your creative vision to life without any hiccups.
| Essential Tools | Materials |
|---|---|
| Cake boards | Frosting/Icing |
| Offset spatulas | Fondant decorations |
| Piping bags & tips | Edible decorations |
Step-by-Step Guide to Leveling and Stacking the Tiers
Leveling and stacking the tiers of a 3-tier cake is an essential part of the decorating process. It requires precision and skill to ensure that the cake is stable and visually appealing. To start, make sure you have a sturdy base for your bottom tier, such as a cake board or foam core board. Place your first tier on the base and use a level to ensure that it is perfectly flat.
Next, you’ll want to fill and stack your tiers using dowels for support. Begin by trimming the tops of each tier to ensure they are level, then add a generous layer of frosting or filling between each layer. Insert dowels into the bottom tier in a circular pattern, making sure they are all level with the top of the cake. This will provide support for the tier above.
Once your tiers are stacked, use a long wooden or plastic dowel through the center of all tiers to keep them secure during transportation. Trim the dowel so that it is flush with the top tier. Finally, you can add any additional decorations around the base of each tier to create a polished look.
Overall, leveling and stacking your 3-tier cake requires patience and attention to detail. With practice and the right tools, you can achieve a beautiful and structurally sound base for your cake decoration.
If you’re interested in learning more about how to decorate a 3-tier cake or expand upon these beginner tips, check out our comprehensive guide on our website for more advanced techniques.
Choosing and Using the Right Frosting and Icing Techniques
When it comes to decorating a 3 tier cake, choosing the right frosting and icing techniques is crucial to achieving a beautiful and delicious end result. Here are some essential tips and techniques for selecting and applying the perfect frostings and icings for your 3 tier cake:
- Choose the Right Frosting: Different types of frosting work better for different purposes. For filling between layers, consider using a rich buttercream or cream cheese frosting for added flavor and moisture. For covering the entire cake, fondant or royal icing can provide a smooth, flawless finish.
- Applying Buttercream: To achieve a smooth buttercream finish on each tier, it’s important to start with a crumb coat. This thin layer of frosting seals in any cake crumbs, creating a smooth base for the final layer of buttercream. Use an offset spatula to apply the crumb coat evenly, then chill the cake before adding the final layer of buttercream.
- Working with Fondant: If you choose to cover your 3 tier cake with fondant, it’s important to roll out the fondant to just the right thickness. Too thick, and it will be difficult to work with; too thin, and it may tear or wrinkle when covering each tier.
Dust your work surface with powdered sugar or cornstarch to prevent sticking, then carefully drape the fondant over each tier and smooth out any wrinkles or air bubbles.
Remember that practice makes perfect when it comes to frosting and icing techniques for decorating a 3 tier cake. Don’t be afraid to experiment with different flavors and textures until you find the perfect combination for your masterpiece.
Creating Stunning and Unique Decorations for Each Tier
When it comes to decorating a 3 tier cake, the possibilities are endless. Each tier offers a canvas for creativity and can be adorned with stunning and unique decorations to make the cake truly stand out. Whether you’re going for a classic, elegant look or something more modern and fun, there are various techniques you can use to decorate each tier in a way that suits your vision.
One of the most popular ways to decorate a 3 tier cake is by using different piping techniques. This can include creating intricate designs with buttercream frosting, adding delicate borders, or even piping on beautiful floral patterns. Additionally, edible lace can be used to add a touch of elegance to the tiers, while edible pearls and beads can be utilized to add some shimmer and dimension.
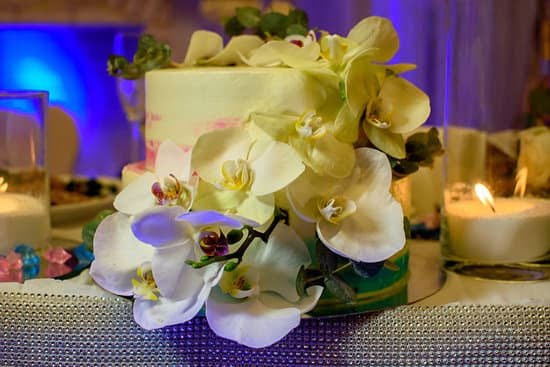
Another way to create stunning decorations for each tier is by using edible flowers and foliage. Fresh flowers can be carefully placed on the tiers for a natural and romantic look, while gum paste or fondant flowers offer a more whimsical and long-lasting option. Edible foliage such as leaves or vines can also be added to create an organic and garden-inspired design.
Furthermore, consider using edible paint or food coloring to add hand-painted designs or colorful accents to each tier. This allows for endless customization and personalization, making it easy to achieve the exact look you desire. By incorporating these techniques, you can create stunning decorations for each tier that will make your 3 tier cake truly memorable.
| Decorating Technique | Description |
|---|---|
| Piping Techniques | Create intricate designs with buttercream frosting or add delicate borders |
| Edible Flowers/Foliage | Add fresh flowers for a natural look or gum paste/fondant flowers for a whimsical design |
| Edible Paint/Food Coloring | Add hand-painted designs or colorful accents for personalized decorations |
These methods provide just a few examples of how you can decorate each tier of your 3 tier cake. With the right tools and materials at hand, along with some creativity and patience, you’ll be able to achieve stunning and unique decorations that will make your cake the centerpiece of any event. Experiment with different techniques until you find the perfect combination that reflects your style and makes your cake truly special.
Tips for Achieving Smooth and Flawless Fondant Covering
Fondant is a popular choice for covering 3 tier cakes as it provides a smooth and flawless finish. Achieving this look can be challenging, but with the right tips and techniques, you can master fondant covering for your next cake decorating project.
Preparing the Fondant
Before you begin covering your tiers with fondant, it’s important to properly prepare the fondant. Knead the fondant until it is pliable and smooth, then roll it out on a clean, non-stick surface using a rolling pin dusted with powdered sugar to prevent sticking. Make sure to roll it out to the appropriate size to cover each tier of your cake.
Applying the Fondant
Once the fondant is rolled out, carefully lift it using a rolling pin and drape it over the top of the first tier. Use gentle downward motions to smooth out any air bubbles or creases, starting from the center and working your way out towards the edges. Trim off any excess fondant at the base of the tier using a sharp knife or pizza cutter.
Achieving a Flawless Finish
To achieve a flawless finish, use a fondant smoother to gently press and smooth the fondant against the sides of each tier. Pay close attention to ensuring that all edges are neat and straight. If you notice any imperfections or wrinkles, use your fingers or a small tool to gently manipulate and smooth them out. With patience and practice, you can achieve a perfectly smooth and flawless fondant covering on each tier of your 3 tier cake.
With these tips in mind, you can confidently tackle the challenge of achieving a smooth and flawless fondant covering for your 3 tier cake decoration project. Remember that practice makes perfect, so don’t be afraid to experiment with different techniques until you find what works best for you and your unique cake design.
Adding Personalized Elements and Finishing Touches
When it comes to decorating a 3 tier cake, adding personalized elements and finishing touches is the perfect way to make your creation truly unique and special. Whether you are making the cake for a wedding, birthday, or any other special occasion, these final touches can really elevate the look of your cake and make it stand out.
One popular way to personalize a 3 tier cake is by incorporating the theme or color scheme of the event into the decorations. You can use edible paint, edible markers, or even edible images to add personalized messages or designs that are meaningful to the person or people being celebrated. For example, if it’s a wedding cake, you could incorporate the couple’s monogram or wedding date into the design.
Another great way to add a personal touch to your 3 tier cake is by using custom-made cake toppers. These can be anything from traditional figurines representing the couple getting married, to whimsical and fun designs that showcase the recipient’s hobbies or interests. You can also include fresh flowers, edible flowers, or handmade sugar flowers as part of the decorative elements to give your cake a personalized and elegant touch.
Finally, don’t forget about adding some extra flair with finishing touches such as metallic accents like gold or silver leaf, edible glitter, or shimmer dust. These little details can really take your 3 tier cake from beautiful to breathtaking. By putting thought and care into these personalized elements and finishing touches, you can create a stunning masterpiece that will be remembered for years to come.
Troubleshooting Common Decoration Challenges
Uneven or Cracked Layers
One of the most common challenges when decorating a 3 tier cake is dealing with uneven or cracked layers. To prevent this issue, make sure your cakes are completely cooled before leveling and stacking. If you still end up with uneven layers, you can use a sharp knife to trim them down to size. For cracked layers, consider using a thick layer of filling to help hold the pieces together.
Crumbling Frosting or Icing
Another challenge that many bakers face is dealing with crumbling frosting or icing. This can be caused by using an old or improperly stored product, as well as trying to frost a cake that hasn’t completely cooled. To avoid this issue, make sure your icing and cake are at the right temperature before starting to decorate. Additionally, consider using a crumb coat – a thin layer of frosting – before applying the final coat to help lock in any loose crumbs.
Fondant Rips and Tears
When working with fondant to cover your 3 tier cake, you may encounter issues such as rips and tears in the fondant. To prevent this problem, make sure your fondant is rolled out evenly and is not too thin. If you do end up with rips or tears, you can gently smooth them out with your fingers or use a small amount of water to help mend the fondant back together.
By being aware of these common decoration challenges and following these troubleshooting tips, you can ensure that your 3 tier cake looks beautiful and professional from top to bottom.
Final Presentation
In conclusion, decorating a 3 tier cake can be a rewarding and impressive feat for any baker. From leveling and stacking the tiers to choosing the right frosting and creating stunning decorations, there are many steps to consider in order to achieve the perfect result. With the right tools, materials, and techniques, anyone can create a masterpiece that will impress guests at any special occasion.
One of the most important aspects of decorating a 3 tier cake is ensuring that it is displayed and served in a way that does justice to the hard work that went into its creation. Whether it’s a wedding, anniversary, or other special event, the final presentation of the cake is crucial.
Consider using a beautiful cake stand to showcase each tier, and don’t forget to add personalized elements such as fresh flowers or custom cake toppers to make it truly unique.
In addition to showcasing the cake itself, it’s also essential to ensure that it is sliced and served properly. Be sure to use a sharp knife for clean cuts and have enough serving utensils on hand for easy distribution.
By paying attention to every aspect of the final presentation and service of your 3 tier cake, you can truly make it the centerpiece of any celebration. So next time you’re tasked with decorating a 3 tier cake remember these tips on how to decorate a 3 tier cake.
Frequently Asked Questions
How Do You Hold a 3 Tier Cake Together?
Holding a 3-tier cake together requires careful stacking and support. Start by placing a cardboard round on the bottom of each tier before stacking them. Then, insert dowels into the lower tiers to support the weight of the tiers above.
How Do You Put Icing on a 3 Layer Cake?
When icing a 3-layer cake, it’s essential to first do a crumb coat to seal in any loose crumbs. Then, add a thicker layer of icing and use a spatula or bench scraper to smooth it out and create an even surface.
How Do You Cut and Serve a 3 Tier Cake?
Cutting and serving a 3-tier cake can be tricky, but it’s important to use a long, sharp knife to make clean cuts through all the layers. Start by cutting a small piece from the top tier, then work your way down through each tier, ensuring that each slice has all the layers intact for presentation.

Welcome to our cake decorating blog! My name is Destiny Flores, and I am the proud owner of a cake decorating business named Cake Karma. Our mission is to provide delicious, beautiful cakes for all occasions. We specialize in creating custom cakes that are tailored specifically to each customer’s individual needs and tastes.


