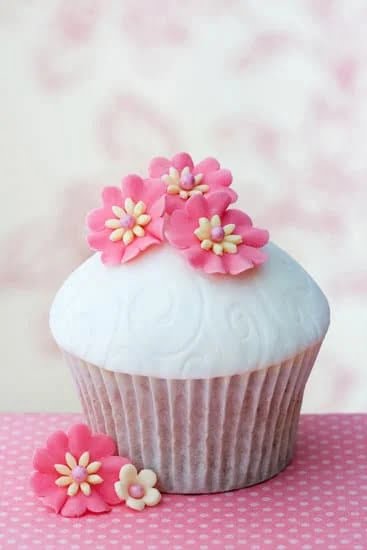
Are you looking to learn how to attach fondant decorations to a fondant cake? Fondant decorations can take your cake decorating to the next level, adding elegance and intricate designs. In this article, we will explore the step-by-step process for attaching fondant decorations to a cake, as well as provide tips for achieving a flawless look. From gathering materials to troubleshooting common issues, you will learn everything you need to know to master this skill.
Fondant decorations are an essential part of cake decorating, allowing for endless creativity and customization. Whether you’re a beginner or an experienced baker, knowing how to properly attach these decorations will elevate the overall look of your cake. We’ll begin by discussing the importance of fondant decorations and providing a brief overview of the process involved in attaching them to a cake.
With the information provided in this article, you will gain valuable insights into preparing both the fondant decorations and the cake itself, before delving into the specific steps for attaching the decorations. By following our guidance, you will be equipped with the knowledge and skills needed to beautifully adorn your cakes with fondant decorations. Get ready to enhance your baking repertoire and impress your friends and family with stunning fondant cakes.
Gathering Materials
When it comes to creating a beautiful fondant cake, gathering the right materials is essential. To successfully attach fondant decorations to your cake, you will need a few key items. First and foremost, you will need pre-made or homemade fondant in various colors, depending on the design of your decorations. You can find these at specialty baking stores or online.
In addition to fondant, you will also need edible adhesive such as gum glue or royal icing to ensure that your decorations stay in place on the cake. Other useful materials include small paintbrushes for applying the adhesive, a rolling pin for flattening the fondant, and various shaped cutters or molds for creating specific decorations.
You can purchase these materials at baking supply stores, craft stores, or online retailers specializing in cake decorating supplies. It’s crucial to have all your materials ready before you begin making and attaching fondant decorations to ensure a smooth and seamless decorating process.
It is important to know how to attach fondant decorations to a fondant cake correctly in order to avoid any mishaps during the decorating process. With the right materials on hand and an understanding of their use, you can achieve stunning results when adorning your cakes with beautiful fondant decorations.
Preparing the Fondant Decorations
When it comes to fondant cake decorating, the decorations themselves play a crucial role in making the cake look visually appealing. Whether you are making fondant flowers, figurines, or any other decorative elements, it’s important to take your time and pay attention to detail. One of the most common questions that arise during this process is how to attach fondant decorations to a fondant cake.
To begin with, it’s essential to ensure that your fondant decorations are created well in advance of when you plan to decorate the cake. This will allow them enough time to dry and harden, making them easier to handle and less likely to lose their shape. Additionally, using a gum paste or fondant mixture will provide more stability in creating intricate shapes and designs.
Once your decorations are ready, it’s necessary to consider how they will connect with the cake. You might choose to use edible glue or royal icing as an adhesive, both of which can help secure the decorations firmly in place without affecting their appearance. It’s important not only for the aesthetics but also for food safety reasons that any materials used for attaching the decorations are edible and safe for consumption.
Lastly, taking some time to plan out where each decoration will go on the cake before actually attaching them can help ensure that everything looks cohesive and well-organized once it’s all put together.
| Fondant Decoration Process | Importance |
|---|---|
| Creating decorations ahead of time | Allows time for drying and hardening |
| Use of edible adhesives | Ensures secure attachment without affecting taste |
| Planning placement beforehand | Ensures a cohesive and well-organized look |
Preparing the Fondant Cake
Proper Way to Cover the Cake With Fondant
Before attaching fondant decorations to a cake, it is crucial to ensure that the cake itself is properly covered with fondant. Start by rolling out the fondant into a smooth, even layer that is large enough to cover the entire cake.
Carefully lift the rolled fondant and drape it over the cake, smoothing out any air pockets or wrinkles as you go. Use a fondant smoother or your hands to gently press the fondant against the sides of the cake, ensuring a secure and even coverage.
Tips for Achieving a Smooth, Even Surface
One of the most important aspects of preparing a cake for fondant decorations is achieving a smooth and flawless surface. To prevent bumps or imperfections from showing through the fondant, consider using a layer of buttercream or ganache to create a smooth base before applying the fondant.
Additionally, take your time when smoothing out the fondant over the cake, being mindful of any creases or folds that may form. Using a gentle touch and working patiently will help you achieve a professional-looking finish for your cake.
Common Mistakes to Avoid When Preparing the Fondant Cake
When covering a cake with fondant, there are several common mistakes to be aware of in order to avoid them. These include rolling out the fondant too thin or too thick, which can make it difficult to work with and affect the overall appearance of the finished cake.
Another mistake is allowing air bubbles to become trapped underneath the fondant, leading to unsightly bulges on the surface. By taking care to properly prepare and cover your cake with fondant, you can set yourself up for success when attaching decorative elements later on.
Attaching Fondant Decorations
Fondant decorations are a great way to add creativity and flair to any cake. Whether you’re making a birthday cake, wedding cake, or celebratory cake for any occasion, fondant decorations can take your creation to the next level. Attaching these decorations to a fondant cake may seem intimidating, but with the right techniques and a little practice, it can be easily mastered.
Gathering Materials
Before you begin attaching fondant decorations to your cake, you’ll need to gather the necessary materials. These may include edible glue or royal icing, small paintbrushes for applying the adhesive, and the fondant decorations themselves. You can find these materials at specialty baking stores, craft stores, or online shops that cater to baking and cake decorating supplies.
Preparing the Fondant Decorations
When preparing fondant decorations for your cake, it’s important to make sure they are the right consistency and size. Roll out the fondant to an even thickness and use various cutters or molds to create shapes such as flowers, leaves, or other decorative elements. Allow enough time for your fondant decorations to dry slightly before attaching them to the cake; this will ensure that they hold their shape when placed on the cake’s surface.
Attaching Fondant Decorations
To attach fondant decorations to a fondant cake, start by gently brushing edible glue or royal icing onto the back of the decoration with a small paintbrush. Carefully place the decoration onto the desired spot on the cake and press lightly to secure it in place. Repeat this process for each decoration, ensuring they are evenly spaced and firmly attached.
Remember that patience is key when attaching fondant decorations; rushing through this process may result in misplaced or smudged decorations. Once all of your fondant decorations are in place, allow them to set before moving or transporting the cake. This will ensure that they stay put and maintain their intended appearance.
By following these tips and techniques for attaching fondant decorations to a fondant cake, you can elevate your cake decorating skills and create stunning confections for any occasion. With practice and attention to detail, you’ll soon be able to confidently showcase beautifully adorned cakes that will impress friends, family, and clients alike.
Troubleshooting
When it comes to attaching fondant decorations to a fondant cake, there can be some challenges that arise. From decorations not sticking properly to accidentally tearing the fondant, troubleshooting these issues is essential for achieving a flawless look. One common problem when attaching fondant decorations is them not adhering to the cake surface as intended. This can be frustrating, but there are solutions for this issue.
One way to ensure that your fondant decorations stick well to the cake is by using edible glue or water. Applying a small amount of either of these substances to the back of the decoration before placing it onto the cake can help create a strong bond. Another tip is to gently press the decoration onto the cake and hold it in place for a few seconds to allow it to adhere properly.
Another common issue when attaching fondant decorations is accidentally tearing them during the process. To avoid this, handle the decorations with care and use a gentle touch when placing them on the cake. If a tear does occur, don’t panic – there are ways to fix it without ruining the overall look of the cake.
One quick solution for repairing torn fondant decorations is using a small paintbrush dipped in water or edible glue. Simply brush a small amount onto the tear and carefully press the torn edges back together. With patience and attention to detail, you can easily repair any tears and maintain a visually stunning cake.
Adding Finishing Touches
After successfully attaching fondant decorations to your cake, you may want to add some extra finishing touches to enhance the overall look. Here are a few creative ideas for adding that final touch of flair to your fondant cake:
- Edible Glitter or Luster Dust: Sprinkle edible glitter or luster dust over the surface of the cake to give it a beautiful shimmer. This works especially well for wedding cakes or other special occasion cakes.
- Painted Details: Use food coloring or edible paint to add intricate designs or hand-painted details to the fondant decorations on the cake. This can take your cake decorating to the next level and really make it stand out.
- Fresh Flowers or Fruit: Adding fresh flowers or fruit as a decorative element can create a stunning visual impact. Just make sure that any non-edible elements are placed on the cake at the last minute to avoid wilting or spoiling.
Remember that when adding finishing touches, less is often more. Overdecorating can detract from the elegance and beauty of your fondant cake, so choose your extra embellishments carefully.
For an added professional touch, consider using specialty tools such as edible ink pens, silicone molds for creating intricate shapes, or customized stamps for embossing patterns onto fondant. These tools can help you achieve a flawless finish and add unique details to your cake designs.
By taking the time to add these extra finishing touches, you can elevate your fondant cake from good to great and leave a lasting impression on everyone who sees and tastes it.
Tips and Tricks
Attaching fondant decorations to a fondant cake requires some finesse and skill, but with the right tips and tricks, you can achieve a flawless result. Here are some professional recommendations for successful fondant cake decorating:
- Use edible glue or royal icing: When attaching fondant decorations to a fondant cake, it’s important to use the right adhesive. Edible glue or royal icing can be used to securely attach your fondant decorations without leaving any visible residue.
- Plan ahead: Before attaching any decorations, carefully plan where each element will go on the cake. This will help you avoid overcrowding or imbalance in the design.
- Handle with care: When handling your fondant decorations, be gentle and precise. This will help prevent any breakage or distortion of the shapes you have created.
Insider Secrets for Successful Fondant Cake Decorating
- Utilize support systems: For larger or heavier fondant decorations, consider using internal supports such as toothpicks or floral wire to keep them in place on the cake.
- Embrace creativity: Don’t be afraid to experiment with different textures, colors, and shapes when making your fondant decorations. The more unique and personalized they are, the more stunning your final cake will be.
- Practice patience: Allow your fondant decorations to fully dry before attaching them to the cake. This will prevent any warping or sagging once they are in place.
By following these expert tips and tricks, you can elevate your fondant cake decorating skills and create visually stunning masterpieces that are sure to impress any audience.
Conclusion
Many individuals may feel intimidated by the prospect of attaching fondant decorations to a fondant cake, but with the right tools and knowledge, it can be an enjoyable and rewarding process. By following the step-by-step instructions provided in this article, you can achieve professional-looking results while expressing your creativity through cake decorating.
To begin the process of attaching fondant decorations to your cake, ensure that you have all the necessary materials on hand. Some essential items include edible glue or royal icing, as well as a small paintbrush for applying the adhesive. These materials can typically be found at specialty baking supply stores or online.
Once you have gathered your materials, carefully prepare your fondant decorations and consider important factors such as color coordination and overall design. It’s crucial to take your time during this stage to ensure that your decorations are well-crafted and free from imperfections.
As you prepare to attach the fondant decorations to your cake, keep in mind some useful tips and tricks for achieving a flawless look. For example, lightly moistening the back of each decoration with edible glue before gently pressing it onto the cake can help ensure a secure attachment. By approaching this step thoughtfully and methodically, you can create a beautifully decorated fondant cake that will impress both yourself and others.
Additional Resources
In conclusion, attaching fondant decorations to a fondant cake can seem like a daunting task, but with the right materials and techniques, it can be a fun and rewarding experience. By following the step-by-step instructions outlined in this article, you can create a beautifully decorated cake that is sure to impress any guest of honor. From gathering the necessary materials to troubleshooting common issues, every aspect of the process has been covered to ensure success.
One important aspect that cannot be stressed enough is the need to properly prepare both the fondant decorations and the cake itself. Taking the time to create smooth, well-shaped decorations and ensuring that the cake is covered flawlessly will make attaching the decorations much easier. Additionally, being mindful of common mistakes and how to avoid or fix them will help you achieve professional-looking results.
For those who may still feel unsure about their abilities, remember that practice makes perfect. Don’t be afraid to try different techniques and explore creative ideas for extra decorations.
There are also plenty of additional resources available, including tutorials and recommended products, which can provide further learning opportunities and inspiration for your next fondant cake decorating project. So go ahead and give it a try – with patience and perseverance, you’ll soon be creating stunning fondant cakes like a pro.

Welcome to our cake decorating blog! My name is Destiny Flores, and I am the proud owner of a cake decorating business named Cake Karma. Our mission is to provide delicious, beautiful cakes for all occasions. We specialize in creating custom cakes that are tailored specifically to each customer’s individual needs and tastes.


