When it comes to cake decorating, the edges play a crucial role in enhancing the overall aesthetics of the final product. Cake decorating edges have the power to make or break a design, adding that finishing touch that takes a cake from ordinary to extraordinary. Perfectly smooth edges can create a professional and polished look, while decorative edges can add flair and personality to your creations.
In this article, we will explore the importance of cake decorating edges and delve into various techniques, tools, and expert tips for achieving flawless results. Whether you are a beginner or an experienced baker looking to elevate your skills, mastering cake decorating edges is an essential step in creating impressive and visually stunning cakes.
Understanding Different Types of Cake Decorating Edges
When it comes to cake decorating, the edges play a crucial role in the overall appearance and presentation of the cake. Understanding the different types of cake decorating edges is essential for creating visually appealing and professional-looking cakes. Whether you are a beginner or an experienced cake decorator, knowing the various techniques and styles will give you a range of options to choose from based on your design vision.
Smooth Edges
One of the most common and classic cake decorating techniques is achieving smooth edges. This technique involves covering the entire cake with fondant or buttercream icing and then smoothing it out using specific tools such as a fondant smoother or an offset spatula. The aim is to create a flawless surface without any bumps, lumps, or visible seams. Smooth edges give cakes a polished and elegant look.
Textured Edges
Textured edges are perfect for adding dimension and character to your cakes. There are various ways to achieve textured edges, depending on the desired effect. Some popular techniques include using stencils, embossing mats, or textured rollers to create patterns and designs on the surface of the cake. Textured edges can range from simple imprints to intricate designs, allowing you to customize your cakes according to different themes and occasions.
Ruffled Edges
Ruffled edges add a whimsical touch to cakes, making them ideal for events such as baby showers or birthday parties. With this technique, you can create delicate frills that resemble fabric ruffles around the bottom edge of the cake. The ruffles can be made from fondant or gum paste by rolling out thin strips of dough and gently pleating them before attaching them around the base of the cake.
Having a good understanding of these different types of cake decorating edges will enable you to choose which technique suits your cake design and theme the best. Experimenting with different styles will allow you to expand your creative abilities and create unique cakes that cater to various preferences and occasions. Additionally, mastering these techniques will elevate your cake decorating skills, enabling you to create visually stunning cakes that are a treat for both the eyes and taste buds.
Tools and Materials Needed for Cake Decorating Edges
To achieve perfectly decorated cake edges, it is important to have the right tools and materials at your disposal. Here is a list of essential items that will help you in achieving professional-looking cake edges:
- Offset Spatula: An offset spatula is a must-have tool for cake decorating. It features a long, narrow blade with an angled tip, making it perfect for spreading icing smoothly and creating clean edges on cakes.
- Bench Scraper: A bench scraper, also known as a dough scraper or pastry scraper, is useful for shaping the sides of your cake. It can be used to smooth out any imperfections or bulges and ensure straight, even edges.
- Cake Turntable: A cake turntable is a rotating platform that allows you to easily access all sides of your cake while decorating. It makes it much easier to apply icing evenly and achieve smooth edges.
- Piping Bags and Tips: Piping bags are essential for adding fine details and decorative elements to your cake edges. Different tips can be used to create various patterns and designs such as stars, rosettes, or ruffles.
- Fondant Smoother: If you are working with fondant, a fondant smoother will come in handy for achieving flawlessly smooth edges. This tool helps remove air bubbles and creases from the fondant surface, resulting in a polished finish.
- Cake Leveler: A cake leveler is useful for trimming the top of your cakes to create an even surface before applying icing. This ensures that the icing layer will be consistent throughout the cake’s height.
- Angled Palette Knife: An angled palette knife can be used for spreading filling between layers of cakes or smoothing buttercream icing along the sides of your cake. Its flexibility allows for precise control when creating sharp corners or smooth curves.
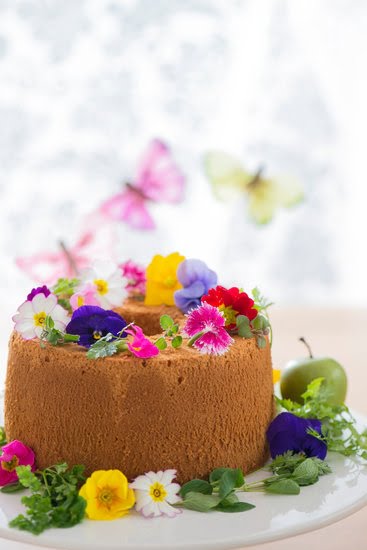
- Edible Decorations: Depending on your design, you may also need additional materials such as edible pearls, sprinkles, or edible flowers to enhance the look of your cake edges.
Having these tools and materials readily available will make the cake decorating process much smoother and more enjoyable. With the right equipment in hand, you can achieve beautifully decorated cakes with perfectly smooth edges that are sure to impress your friends and family.
Step-by-Step Guide
Achieving perfectly smooth cake edges is the key to creating a polished and professional-looking cake. It may seem like a daunting task, but with the right techniques and practice, anyone can achieve beautiful results. In this step-by-step guide, we will walk you through the process of achieving flawlessly smooth cake edges.
Gather Your Tools
Before you begin decorating your cake, it’s important to have all the necessary tools and materials on hand. Here are some essential items you’ll need:
- Offset spatula: This angled spatula is perfect for spreading icing smoothly on the sides of the cake.
- Bench scraper: The bench scraper is essential for achieving straight and even edges on your cake.
- Turntable: A turntable allows you to easily rotate the cake as you frost it, making it easier to achieve a smooth finish.
- Piping bag and tips (optional): If you plan on adding any decorative piping to your cake edges, make sure to have piping bags and tips ready.
Prepare Your Cake
Start by trimming any domed or uneven tops from your cake layers using a serrated knife. This will ensure that your final result has level and even layers. Once trimmed, place one layer of cake onto a cardboard or acrylic board cut to the size of your cake.
Next, apply a thin layer of buttercream or ganache onto the top of the first layer using an offset spatula. Make sure the layer is evenly spread across the surface. Repeat this step with each subsequent layer until your entire cake is stacked.
Crumb Coat
To create a smooth canvas for frosting, apply a crumb coat to your stacked cake. A crumb coat is a thin layer of buttercream or ganache that helps seal in any loose crumbs. Use an offset spatula to apply a thin layer of frosting all over the sides and top of the cake. It doesn’t need to be perfect at this stage, as it will be covered with a final layer of frosting.
Frosting the Cake
Now it’s time to apply the final layer of frosting to your cake. Start by adding a generous dollop of frosting onto the top of your cake and use an offset spatula to spread it evenly across the surface. Once the top is smooth, move on to the sides.
Hold your offset spatula against the side of the cake at a slight angle and rotate your turntable while dragging the spatula around the edge. Repeat this motion until you have a smooth finish all around.
Continue smoothing out any imperfections by holding your bench scraper against the side and gently rotating the turntable. This will help create sharp edges and remove any excess frosting. Be sure to clean off your bench scraper between passes for a cleaner finish.
With these step-by-step instructions, achieving perfectly smooth cake edges is within reach. Practice makes perfect, so don’t be discouraged if it takes a few tries to get it just right. The more you practice, the better you’ll become at creating flawlessly smooth cake edges that will impress everyone who lays eyes on your creations.
Decorative Cake Edges
When it comes to cake decorating, adding decorative edges is a great way to elevate the overall look of your designs. Whether you’re working on a birthday cake or a wedding cake, incorporating unique and stylish edges can truly make your creation stand out. In this section, we will explore different techniques and ideas for decorative cake edges that will add flair and sophistication to your designs.
One popular technique for creating decorative edges is using piping. Piping can be done with various nozzles to achieve different effects such as ruffles, shells, or waves. To create ruffles, simply attach a petal nozzle to your piping bag and pipe small, continuous loops around the edge of your cake.
For a shell border, use a star-shaped nozzle and pipe small shell-shaped swirls along the edge. If you want to create a wavy pattern, use a serrated-edge nozzle and pipe gentle waves around the cake.
Another way to add flair to your cake edges is by using fondant or gum paste decorations. These can easily be molded into intricate shapes and designs, allowing you to create unique borders that match the theme of your cake. From delicate flowers and leaves to intricate lace patterns or geometric shapes, the possibilities are endless when it comes to using fondant or gum paste for decorative edges.
Additionally, you can experiment with different finishes for your decorative edges. One option is adding edible glitter or luster dust onto the piped or fondant decorations for a sparkling effect. Another idea is to use edible pearls or dragees along the edge of your cake for an elegant touch. You can also try using edible paint or food coloring pens to hand-paint small details onto the piped designs or fondant decorations.
Incorporating decorative edges into your cake designs not only adds visual interest but also showcases your creativity and attention to detail as a decorator. Whether you choose piping, fondant or gum paste decorations, or other embellishments, these decorative edges will surely impress your guests and elevate the overall look of your cakes. So go ahead and experiment with different techniques and ideas to create stunning and unique decorative cake edges that will take your designs to the next level.
Troubleshooting Common Issues with Cake Decorating Edges
While achieving perfectly smooth and flawless cake decorating edges can be a rewarding experience, it is not always without challenges. In this section, we will discuss some common issues that may arise when decorating cake edges and provide troubleshooting tips to help you overcome them.
One common issue that decorators face is air bubbles in the frosting or icing. These air bubbles can create an uneven surface and disrupt the smoothness of your cake edge. To avoid this problem, be sure to fully incorporate your frosting or icing by stirring it well before applying it to the cake. Additionally, you can use a spatula or bench scraper to gently smooth out any air bubbles as you apply the frosting.
Another challenge that decorators encounter is bulging or oozing filling between cake layers. This can occur when there is too much filling or when the filling hasn’t been properly sealed in between layers. To prevent this issue, make sure to spread a thin layer of buttercream or ganache on each layer before adding your filling.
This layer acts as a barrier and helps keep the filling in place. Additionally, consider chilling your filled cake before applying the final coat of frosting to further stabilize the layers.
A third issue that may arise relates to achieving sharp and clean corners on square or rectangular cakes. Getting precise corners can seem daunting at first, but it can be achieved with practice and attention to detail. One helpful tip is to use a ruler or straight edge tool against the sides of your cake as you frost it. This will ensure that all sides are straight and level, resulting in clean corners.
By being aware of these common issues and implementing these troubleshooting techniques, you will be better equipped to achieve beautifully decorated cake edges every time. Remember that practice makes perfect, so don’t get discouraged if you encounter challenges along the way. With patience and determination, you will master these techniques and achieve professional-looking results in no time.
Expert Tips and Tricks for Mastering Cake Decorating Edges
When it comes to cake decorating, achieving perfectly smooth edges can be a challenge. However, with the right tips and tricks, you can master this skill and take your cake designs to the next level. Here are some expert tips that will help you create flawless cake edges:
- Use a turntable: A turntable is an essential tool for cake decorating. It allows you to easily rotate the cake while frosting, ensuring even coverage on all sides. This makes it easier to achieve smooth edges without any lumps or uneven spots.
- Crumb coat your cake: Before applying the final layer of frosting, it’s crucial to crumb coat your cake. A crumb coat is a thin layer of frosting that seals in any loose crumbs, creating a smooth surface for the final layer. This step helps prevent crumbs from mixing into your final frosting and ensures clean, polished edges.
- Use an offset spatula: An offset spatula is another valuable tool for achieving smooth edges. Its angled blade allows you to easily spread and smooth frosting across the sides of the cake. Start from the bottom and work your way up, using long strokes to create an even layer of frosting.
- Chill your cake: After applying the final layer of frosting, chill your cake in the refrigerator for at least 30 minutes before smoothing out the edges. The cold temperature will help set the frosting and make it easier to achieve clean lines when using a spatula or bench scraper.
| Tool | Function |
|---|---|
| Turntable | Allows for easy rotation of the cake while frosting |
| Offset spatula | Angled blade for spreading and smoothing frosting |
| Bench scraper | Straight edge for creating sharp, clean lines on the cake edges |
| Piping bags and tips | Used for adding decorative designs to cake edges |
With these expert tips and the right tools, you’ll be well on your way to mastering cake decorating edges. Practice makes perfect, so don’t be afraid to experiment with different techniques and designs. Remember, the key is to have patience and attention to detail. Happy cake decorating.
Unique and Creative Cake Edges
When it comes to cake decorating, thinking outside the box can truly elevate your designs and make them stand out. Unique and creative cake edges are a great way to add personality and flair to your creations. By experimenting with different techniques and materials, you can achieve stunning and unexpected results.
One popular trend in unique cake edges is the use of edible decorations. This can include anything from edible flowers and leaves to intricate sugar lace or fondant appliques. These decorations can be placed along the edge of the cake, creating a beautiful border that adds visual interest and texture. Edible decorations not only look impressive, but they also enhance the overall taste of the cake.
Another way to create unique cake edges is by using unconventional tools and materials. For example, instead of using traditional piping tips to create a smooth edge, you can try using stencils or even cookie cutters in various shapes or patterns. By pressing these tools gently against the side of the cake, you can create interesting textures or imprints that make your design one-of-a-kind.
In addition to experimenting with tools and materials, you can also play with color to create eye-catching cake edges. Instead of sticking with a single shade, consider using multiple colors on different parts of the edge. This technique works particularly well for ombré effects or gradient designs where one color smoothly transitions into another. You can achieve this effect by using an offset spatula or a palette knife to blend the colors together seamlessly.
By stepping outside of traditional boundaries and exploring unique ideas for cake edges, you have an opportunity to showcase your creativity and make a lasting impression on anyone who sees your creation. Don’t be afraid to experiment with different techniques, materials, and colors – after all, that’s what makes cake decorating so exciting. So next time you’re working on a cake design, think outside the box when it comes to those final finishing touches on the edges.
| Technique | Description |
|---|---|
| Edible Decorations | Adds visual interest and texture to the cake edge. Enhances the taste of the cake. |
| Unconventional Tools and Materials | Experiment with stencils or cookie cutters for interesting textures and imprints on the edge. |
| Color Blending | Create eye-catching effects by blending multiple colors on different parts of the edge, such as ombré or gradient designs. |
Conclusion
In conclusion, mastering the art of cake decorating edges is a surefire way to elevate your cake decorating skills and create visually stunning desserts. Understanding the different types of edges and having the right tools and materials are essential for achieving perfectly smooth cake edges. By following a step-by-step guide and troubleshooting common issues, you can ensure that every edge on your cakes is flawless.
Adding decorative cake edges not only enhances the visual appeal of your creations but also allows you to unleash your creativity and add flair to your designs. Experiment with different techniques and patterns to create unique and eye-catching cake edges that will impress your friends, family, or clients.
While it may take practice to achieve perfection, there are expert tips and tricks that can help you along the way. Pay attention to temperature, consistency, and pressure when working with frosting or fondant, as these factors can greatly impact the final result. Additionally, thinking outside the box and trying out unconventional cake edge designs can truly set your creations apart from the rest.
Frequently Asked Questions
How to do textured sides on cake?
To achieve textured sides on a cake, there are a few techniques you can employ. One popular method is using a spatula or palette knife to create swirls or waves on the sides of the cake. Start by applying a thin layer of frosting all around the cake and then use the edge of the spatula to create desired patterns by gently dragging it through the frosting.
Another approach is using textured mats or impression tools, which can be pressed on the frosted cake to leave imprints of various patterns like diamonds or floral designs. Alternatively, you could experiment with piping different textures onto your cake using various piping tips to achieve raised patterns or lines.
How do you outline a cake?
Outlining a cake can provide visually appealing definition and enhance its overall appearance. Begin by preparing your desired frosting consistency, ensuring that it is soft enough to pipe but still holds its shape well. Next, fill a piping bag fitted with a small round tip (a number 3 or 4 usually works well) with the frosting.
Gently squeeze the bag while moving in an even motion around the edges of your cake, creating an outline as you go. Maintain steady pressure for consistent thickness and try to keep an even distance from the edge throughout. Once you’ve outlined your cake, continue filling in the center with frosting using either zigzag motions or smooth strokes until it’s completely covered.
What are the best cake decorating tips?
When it comes to cake decorating tips, there are several options that beginners and experienced bakers alike often find useful. A star tip (commonly known as a #1M or #2D tip) is great for creating rosettes, swirls, and decorative borders like shells or stars with ease and precision. A small round tip (around #3 or #4) is ideal for writing messages or outlining intricate details on cakes with accuracy.
If you want fine lines for delicate designs or lettering, using a fine writing tip (such as a #1 or #2 tip) is recommended. For filling in large areas, a larger round-tip or an open star tip allows for quicker coverage and can create a textured finish. Ultimately, the best cake decorating tips vary depending on your specific needs and preferences, so experimenting with different sizes and shapes will help you find what works best for your designs.

Welcome to our cake decorating blog! My name is Destiny Flores, and I am the proud owner of a cake decorating business named Cake Karma. Our mission is to provide delicious, beautiful cakes for all occasions. We specialize in creating custom cakes that are tailored specifically to each customer’s individual needs and tastes.

