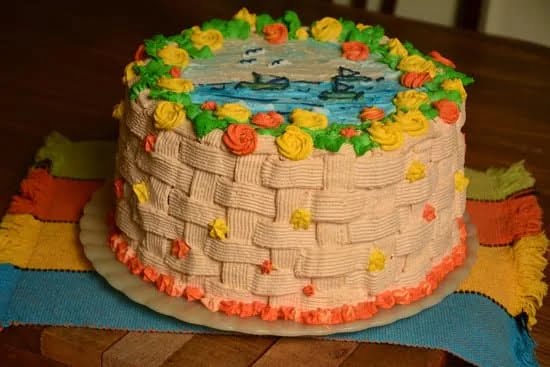
Are you looking to add a personal touch to your next cake creation? Learn how to decorate a cake with a picture and elevate your baking skills to the next level. Welcome to the world of cake decorating with edible images, where you can transform a plain cake into a stunning work of art.
Whether you’re celebrating a birthday, anniversary, or any special occasion, incorporating an edible image into your cake design can truly make it stand out. In this article, we will guide you through the process of choosing the right image, preparing and applying it onto the cake, and adding finishing touches to create a show-stopping dessert.
With step-by-step instructions and expert tips, you’ll be able to create professional-looking results that are sure to impress your friends and family. So, grab your baking tools and get ready to explore the exciting world of cake decorating with edible images.
Gathering Materials
Decorating a cake with a picture is an exciting and creative way to personalize any celebration. To get started, it’s important to have the right materials on hand. Here’s a list of essential supplies you’ll need for decorating a cake with a picture:
1. Edible Image: The most crucial element for decorating a cake with a picture is, of course, the edible image itself. This can be customized with any design or photograph of your choice and can be ordered from specialty bakeries or made at home using edible printing technology.
2. Frosted Cake: You’ll need a frosted cake as the canvas for your edible image. Make sure the frosting on the cake is smooth and free from any lumps or bumps that could affect the application of the image.
3. Scissors: A pair of sharp, clean scissors will be necessary to carefully cut out the edible image to fit the desired area of the cake.
4. Spatula: Using a spatula will help you to carefully lift and position the edible image onto the cake without damaging it.
5. Corn Syrup or Piping Gel: To adhere the edible image to the frosted cake, you’ll need corn syrup or piping gel, which acts as an edible “glue” and helps to secure the image in place.
6. Optional Decorative Tools: Depending on your desired design, additional decorative tools such as icing, fondant, sprinkles, or food coloring might be used to enhance the overall look of the cake.
Having these essential supplies ready will ensure that you are well-prepared to successfully decorate a cake with a picture. In the next section, we will discuss tips for selecting the perfect picture for your cake decoration.
Choosing the Right Image
Consider the Occasion
When selecting an image for your cake decoration, consider the occasion for which the cake is being made. For example, if it’s a birthday celebration, you may want to use a photo of the birthday person. If it’s a wedding, an image of the couple or their initials would be fitting. Matching the image to the occasion adds a personal touch to the cake.
Image Quality
When choosing an image for your cake decoration, ensure that it is of high quality. A blurry or low-resolution image will not transfer well onto the cake and may result in a less-than-desirable outcome. If using a personal photograph, make sure it is clear and crisp before having it printed as an edible image.
Edible Image Theme
Consider selecting an edible image that complements the theme of your event or ties in with any other decorations that will be used on the cake. Whether it’s a cartoon character for a children’s party or a scenic landscape for a nature-themed event, coordinating the edible image with the overall theme will create a cohesive and visually appealing cake design.
By carefully considering these tips when choosing an image for your cake decoration, you can ensure that your finished creation will be both visually stunning and meaningful to those enjoying it.
Preparing the Edible Image
Once you have your edible image ready, it’s crucial to handle it properly to ensure that it stays intact and looks perfect on your cake. Here are some step-by-step instructions on how to prepare and handle the edible image for cake decoration.
Trimming the Image
Before placing the edible image onto the cake, you may need to trim it to fit the size and shape of the cake properly. Use a clean pair of scissors to carefully cut around the edges of the image, leaving a small border if desired. Be sure to trim any excess paper around the image so that only the edible part remains.
Handling With Care
When handling the edible image, be gentle and avoid touching the printed surface with your fingers as much as possible. The oils from your skin can cause smudging or discoloration, so it’s best to hold the image by its edges or use a pair of tweezers for more precise handling.
Storing Guidelines
If you’re not using the edible image right away, it’s important to store it correctly to prevent damage or deterioration. Place the image flat in a cool, dark place away from direct sunlight and moisture. Avoid refrigerating or freezing the edible image as condensation can ruin it.
By following these step-by-step instructions, you can ensure that your edible image is well-prepared and ready for application onto your cake. Understanding how to handle and store the image properly will contribute to a successful cake decorating experience that impresses both you and your guests with stunning results using this method of decorating technique.
Applying the Image
Once you have your edible image ready, it’s time to carefully place it onto the cake. Here’s a detailed guide on how to do it:
1. Prepare the cake: Make sure the surface of your cake is clean and flat before applying the edible image. You can lightly brush the top of the cake with a simple syrup (equal parts sugar and water) to make it slightly sticky, which will help the edible image adhere better.
2. Gently remove the backing: Carefully peel away the plastic backing from the edible image. If you’re using a frosting sheet, this step should be done right before placing it on the cake to prevent any potential damage or discoloration.
3. Place the image onto the cake: Once you’ve removed the backing, gently lay the edible image onto the cake starting from one end and laying it down slowly to avoid air bubbles or wrinkles. Use your hands or a flat spatula to carefully smooth out any wrinkles and ensure that it’s securely in place.
4. Smooth out any imperfections: If there are any air bubbles or wrinkles, use a small pin to prick them and then smooth them out with your fingers or a clean cloth.
5. Let it set: Allow the edible image to set in place for at least 15-20 minutes before adding any additional decorations or serving the cake.
By following these steps, you’ll achieve a professional-looking result when decorating your cake with an edible picture. Just remember to work slowly and carefully to avoid damaging or misplacing your edible image.
Remember that patience and precision are key when working with delicate edible images, so take your time and enjoy the process of creating a beautiful personalized cake for any occasion.
Adding Finishing Touches
When it comes to decorating a cake with a picture, adding finishing touches can take the cake to the next level. Here are some creative ideas for incorporating additional decorations to enhance the overall look of the cake:
- Use frosting or icing to pipe on borders or designs around the edges of the edible image. This can help blend the image seamlessly into the rest of the cake and create a more polished look.
- Consider adding texture with different piping tips, such as star tips or leaf tips, to create dimensional decorations that complement the edible image.
- Incorporate edible glitter, sprinkles, or pearls to add sparkle and visual interest to the cake. These small embellishments can add a touch of whimsy and glamour to the overall design.
Additionally, you can use fondant to create three-dimensional decorations that coordinate with the theme of the edible image. For example, if your cake features a picture of a floral arrangement, you can use fondant to craft delicate flowers or leaves that can be placed around the base of the cake or cascading down its sides for an elegant touch.
Lastly, consider using fresh fruit, like berries or sliced citrus, as a natural and colorful garnish that complements the flavors of the cake while also enhancing its visual appeal. It’s important to remember that when adding finishing touches to a cake with an edible image, moderation is key. Over-decorating can overwhelm the focal point-the picture-so be mindful of balance and cohesion in your design.
Now that you have some creative ideas for finishing touches, it’s time to put them into practice and take your decorated cakes to new heights.
Troubleshooting
When decorating a cake with a picture, there are several common issues that may arise. One of the most frequent problems is air bubbles forming underneath the edible image, which can cause it to wrinkle or tear. To prevent this, make sure to smooth out the image carefully as you apply it to the cake. If air bubbles do appear, use a pin to gently prick the bubble and then smooth it out with your fingers.
Another issue that decorators often encounter is color bleeding. This happens when the colors from the edible image start to spread or run once they come in contact with moisture from the frosting. To avoid this, try using a lighter layer of frosting on the cake and applying the image as soon as possible after frosting. If color bleeding does occur, gently dab at the affected area with a paper towel to absorb any excess moisture.
Lastly, some people may struggle with getting the edible image to stick properly onto the cake surface. This can be remedied by lightly misting the surface of the cake with water before applying the image. The moisture will help create better adhesion between the image and the cake. Additionally, ensure that there are no large crumbs or significant imperfections on the frosting before laying down the edible image.
| Common Issue | Solution |
|---|---|
| Air Bubbles | Smooth out carefully and use a pin to remove bubbles |
| Color Bleeding | Use a lighter layer of frosting and dab at affected areas with paper towel |
| Poor Adhesion | Mist cake surface lightly with water before applying edible image |
Tips and Tricks
Decorating a cake with a picture can seem daunting, but with the right tips and techniques, you can achieve professional-looking results that will impress your friends and family. Here are some pro tips and tricks to help you master the art of cake decorating with edible images.
One important tip for achieving professional-looking results when decorating a cake with a picture is to ensure that your edible image is the right size and shape for your cake. Measure the dimensions of your cake carefully and select or resize your image accordingly. This will help prevent any awkward gaps or overlaps when applying the edible image to the cake.
Another pro tip is to use high-quality edible images and printing equipment. Investing in good quality edible paper and ink will make a significant difference in the color accuracy and overall appearance of your edible image. Additionally, ensuring that your printer is properly calibrated and maintained will help you achieve crisp, clear images for your cake decorations.
When applying the edible image to the cake, it’s crucial to work slowly and carefully. Use a gentle touch to smooth out any air bubbles or wrinkles that may form during application. A helpful technique is to start from the center of the image and work outward, using a clean, dry cloth or fondant smoother to press out any imperfections.
By following these pro tips and techniques, you can elevate your cake decorating skills and create stunning, professional-looking cakes adorned with beautiful edible images. With practice and attention to detail, you’ll be able to decorate cakes with pictures that amaze and delight anyone who sees them.
Conclusion
In conclusion, cake decorating with edible images is a delightful and creative way to personalize special occasions. With the right materials, image selection, preparation, application, and finishing touches, anyone can achieve professional-looking results. Whether it’s a birthday, anniversary, or other milestone celebration, adding a personalized touch with a picture on the cake is sure to be a hit.
By following the step-by-step instructions and tips provided in this guide, readers can confidently try their hand at decorating cakes with edible images. The troubleshooting section also offers solutions to common issues that may arise during the process. Additionally, the pro tips and techniques shared can help elevate the overall look of the cake and ensure a visually stunning result.
We encourage readers to share their experiences or creations on social media platforms such as Instagram or Facebook. By doing so, they can inspire others to explore the world of cake decorating with edible images and showcase their unique designs.
It’s an excellent opportunity for budding bakers and experienced decorators alike to connect with others who share their passion for creating beautiful and delicious treats. So why not give it a try and start sharing your own edible image cake creations today?
Frequently Asked Questions
How Do You Put a Picture on a Cake?
Putting a picture on a cake can be done by printing the image onto edible paper with edible ink. Once printed, the image can be carefully placed on top of the cake using a light layer of icing to adhere it.
How Do You Transfer a Picture Onto a Cake?
Transferring a picture onto a cake involves first selecting and sizing the image to fit the cake, then printing it onto edible paper with edible ink. The image is then gently transferred onto the cake’s surface using a steady hand and careful placement.
How Do They Make Cakes With Pictures on Them?
Cakes with pictures on them are made using edible paper and ink. After printing the desired image, it is delicately placed on top of the cake and smoothed out to ensure there are no air bubbles or wrinkles in the transfer. The result is a personalized and visually appealing dessert for any occasion.

Welcome to our cake decorating blog! My name is Destiny Flores, and I am the proud owner of a cake decorating business named Cake Karma. Our mission is to provide delicious, beautiful cakes for all occasions. We specialize in creating custom cakes that are tailored specifically to each customer’s individual needs and tastes.


